SOP — Wortway CIP & Sanitisation
FUERST WIACEK Version 1.6 | Brewhouse — wortway & heat exchanger | Frequency: per brew (CIP after mash-in, sanitisation at boil start) + end-of-day/week clean
Pre-Conditions
Warning
CIP Tank 1 up-concentration must be completed before running the wortway CIP. This does not have to happen immediately before — it can be done in the morning with the CIP starting later after other tasks. But it must happen on the same day. The sanitisation recipe does not require up-concentration.
Refer to the CIP Up-Concentration SOP.
Purpose
The wortway and heat exchanger must be cleaned at the end of every production week to prevent biofilm formation and microbial growth. On brew days, both a CIP clean and a full sanitisation are required before wort can be sent to a fermentor in a microbiologically stable condition. These are two separate Botec recipes and must be run in sequence.
The CIP recipe should be launched as soon as practicable after mash-in. On double brew days, the wortway may be cleaned the day prior to wort knockout provided the destination tank is ready and the cellar lines are free. The sanitisation recipe is always launched at the start of the boil.
Once the CIP and sanitisation are complete for a brew, tick the WW CIP and WW Sani columns in the Brewing tab of the production spreadsheet and add your initials.
PPE Required
Warning
Do not handle chemical connections without safety goggles and chemical-resistant gloves.
Risks
| Hazard | Risk |
|---|---|
| Loose or incorrectly fitted connections | Leaks, spray of hot liquid or chemical |
| Hot liquid in wortway | Scalding burns |
| Chemical exposure | Skin and eye burns |
| Incorrect panel or valve setup | CIP circuit fails to close; system cannot clean |
| Wrong tank selected in Botec | CIP routed to incorrect vessel |
| Cellar lines not validated in Botec | System cannot complete clean or sanitisation |
Panel & Tank Reference
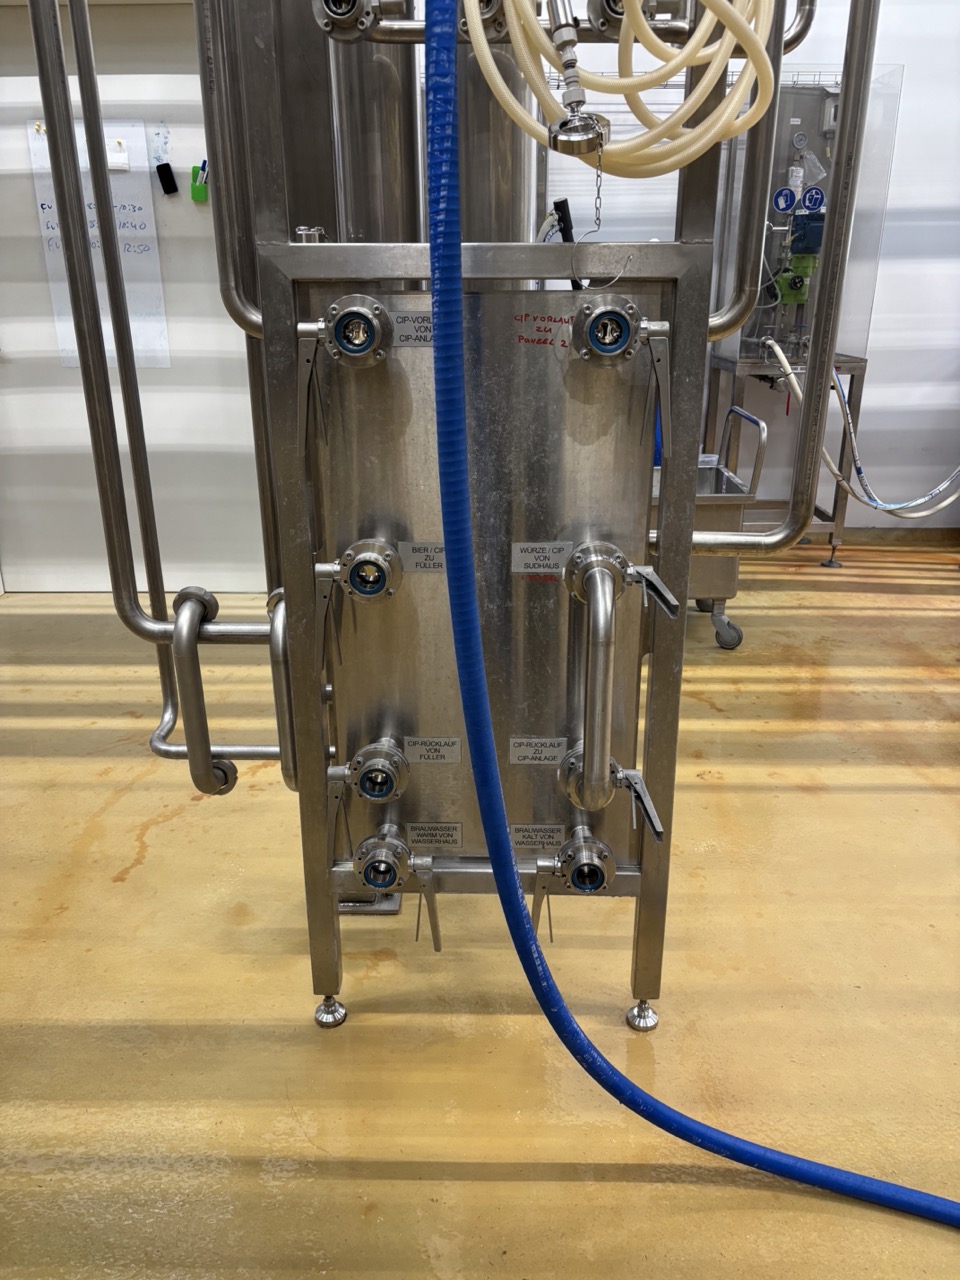
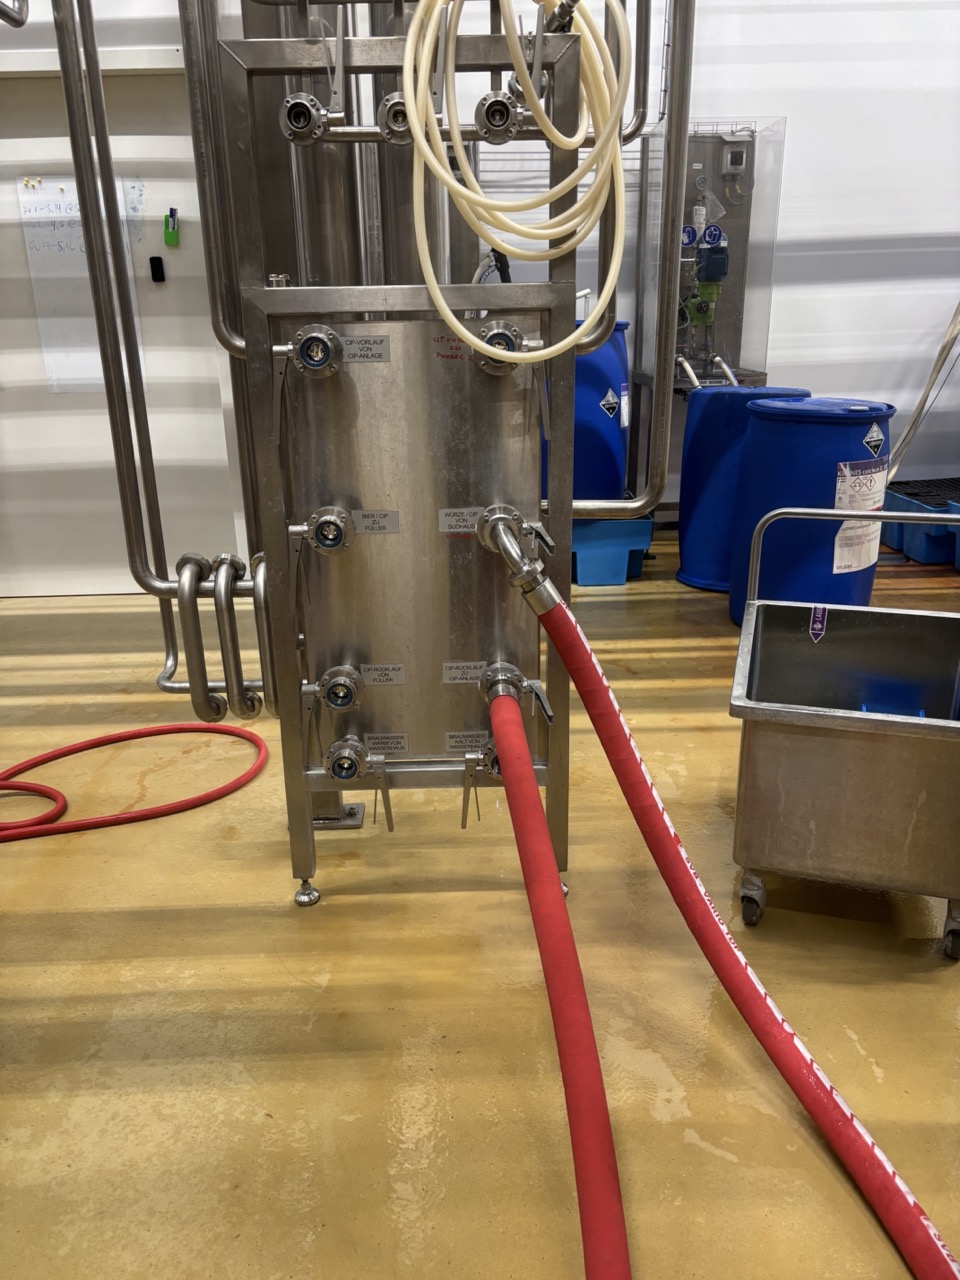
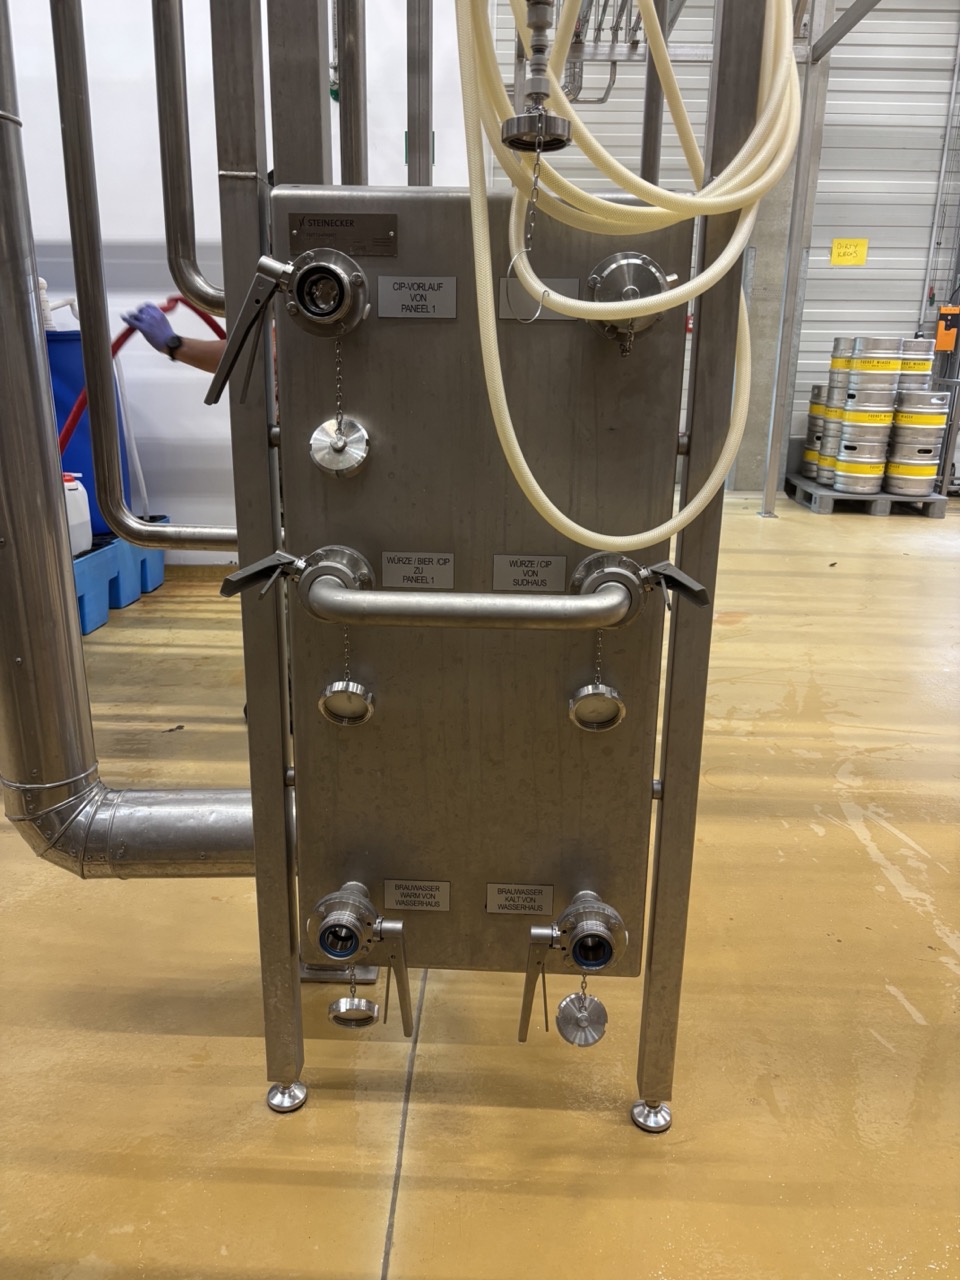
Wort arrives at Panel 2 first. Connect hoses at the panel that corresponds to the destination tank. The swing bend configuration at Panel 1 changes depending on which panel is active.
| Panel | Tanks | Panel 1 swing bend |
|---|---|---|
| Panel 1 | 1, 2, 3, 5, 6, 7, 9, 10, 11 | Connect Wort Vorlauf to Panel 1 |
| Panel 2 | 13, 14, 15, 16, 17, 18, 19 | Connect Panel 2 Vorlauf to CIP return at Panel 1 |
Equipment
| Setup | Equipment |
|---|---|
| All | Safety goggles and chemical-resistant gloves, key for tightening connections |
| A — Brew Day, Harvested Yeast Pitch (standard) | CIP-ready destination tank (PAA drained); T-piece; 3 × DN40 hoses (2 long: 5 or 10 m, 1 short: 1.5 m); yeast pitch line fittings at T-piece in order: sightglass → short DN40 hose → sightglass with tri-clamp → tri-clamp to DN adapter → long hose to CIP return on active panel; long hose from T-piece front to Würze/CIP outlet on active panel; yeast brink in position before knockout |
| B — Brew Day, Fresh Yeast or Second Batch (exception) | CIP-ready destination tank (PAA drained); T-piece; 2 × DN40 long hoses (5 or 10 m) |
| C — End of Week / No Wort | Swing bend to connect delivery and return lines directly at the cellar panel |
Process
1. Pre-CIP Setup — Brewhouse
- Complete the CIP system up-concentration, typically after mash-in.
- Set up the swing bends on the brewhouse panel for CIP. Refer to the panel photo for the correct configuration.
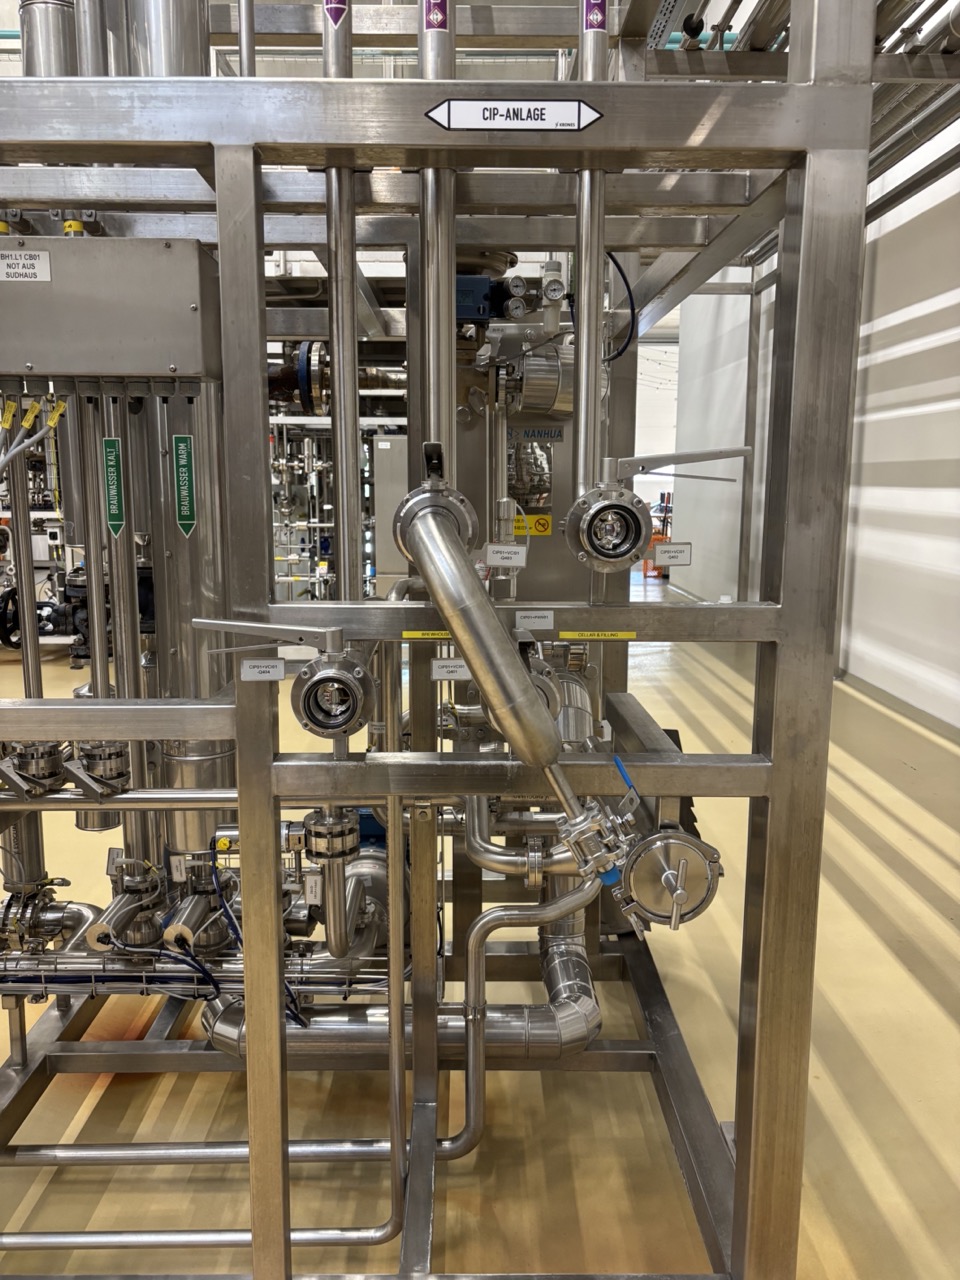
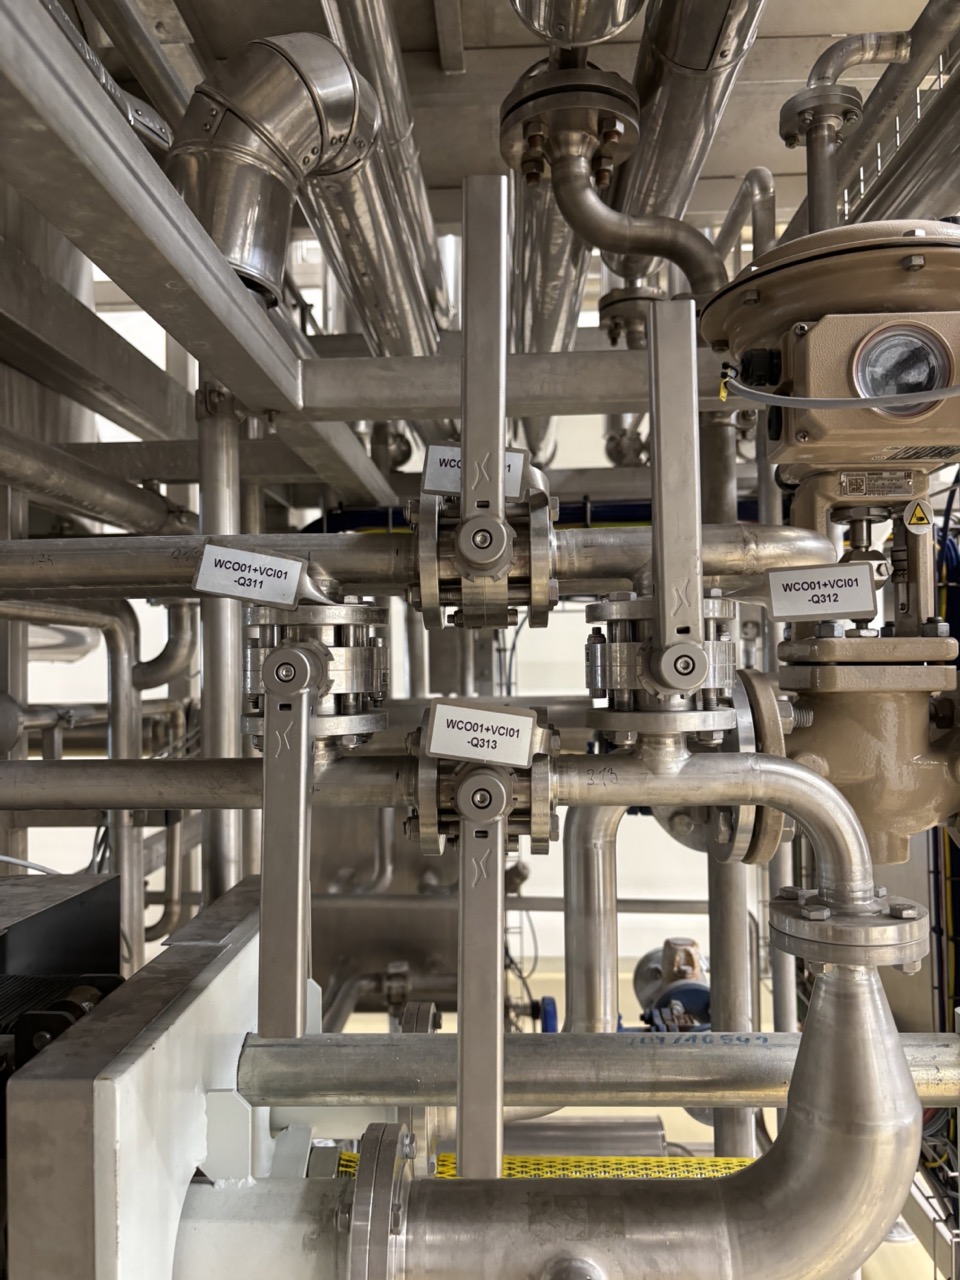
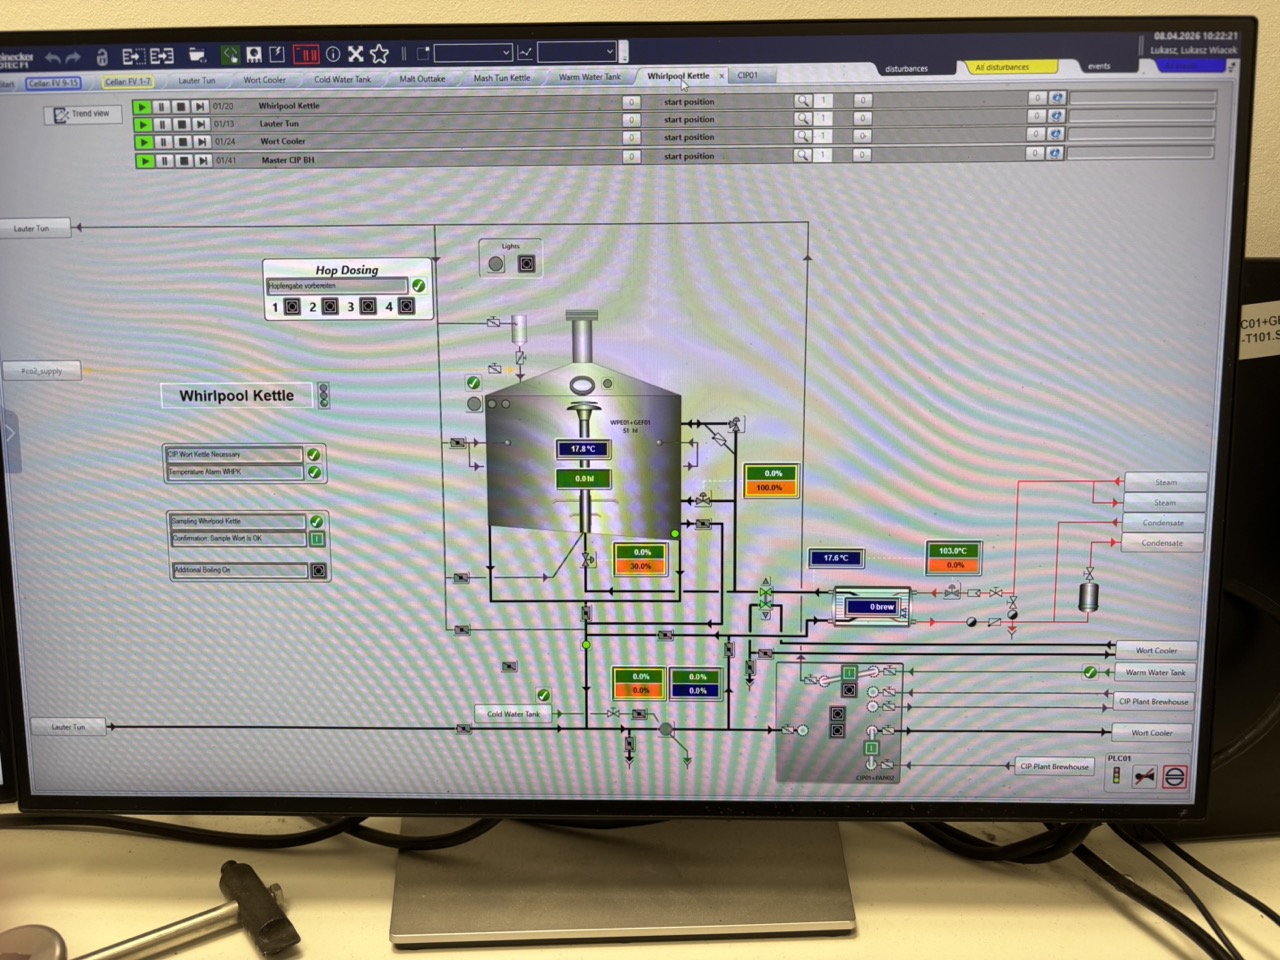
- Set the wortway valves to backflush / reverse flow. The heat exchanger valve cluster shows the correct state.
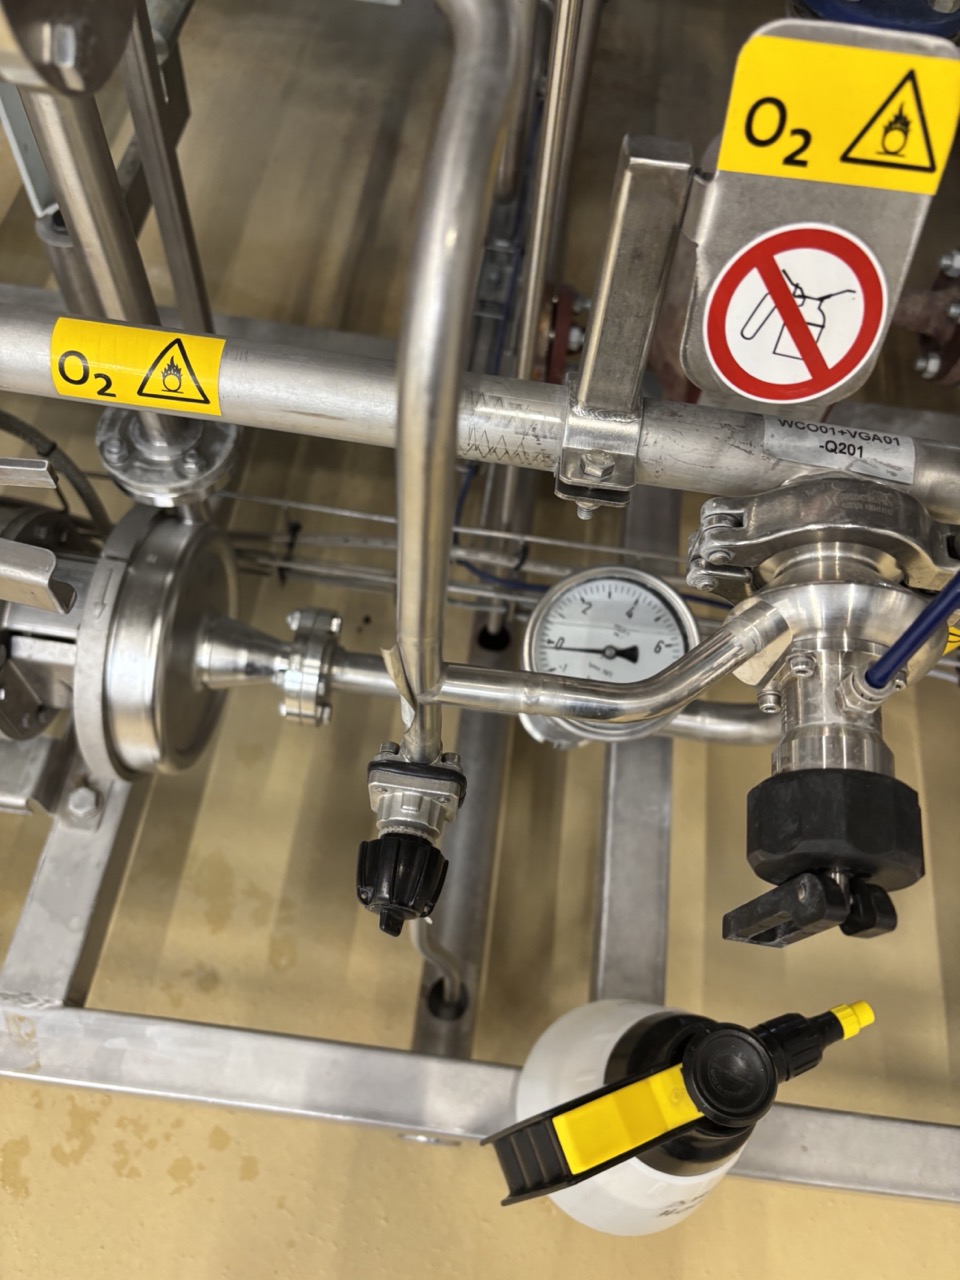
- Set up the aeration path for CIP. The swing bend must be in the CIP position and the O₂ pipe drain must be closed — no red indicator visible.
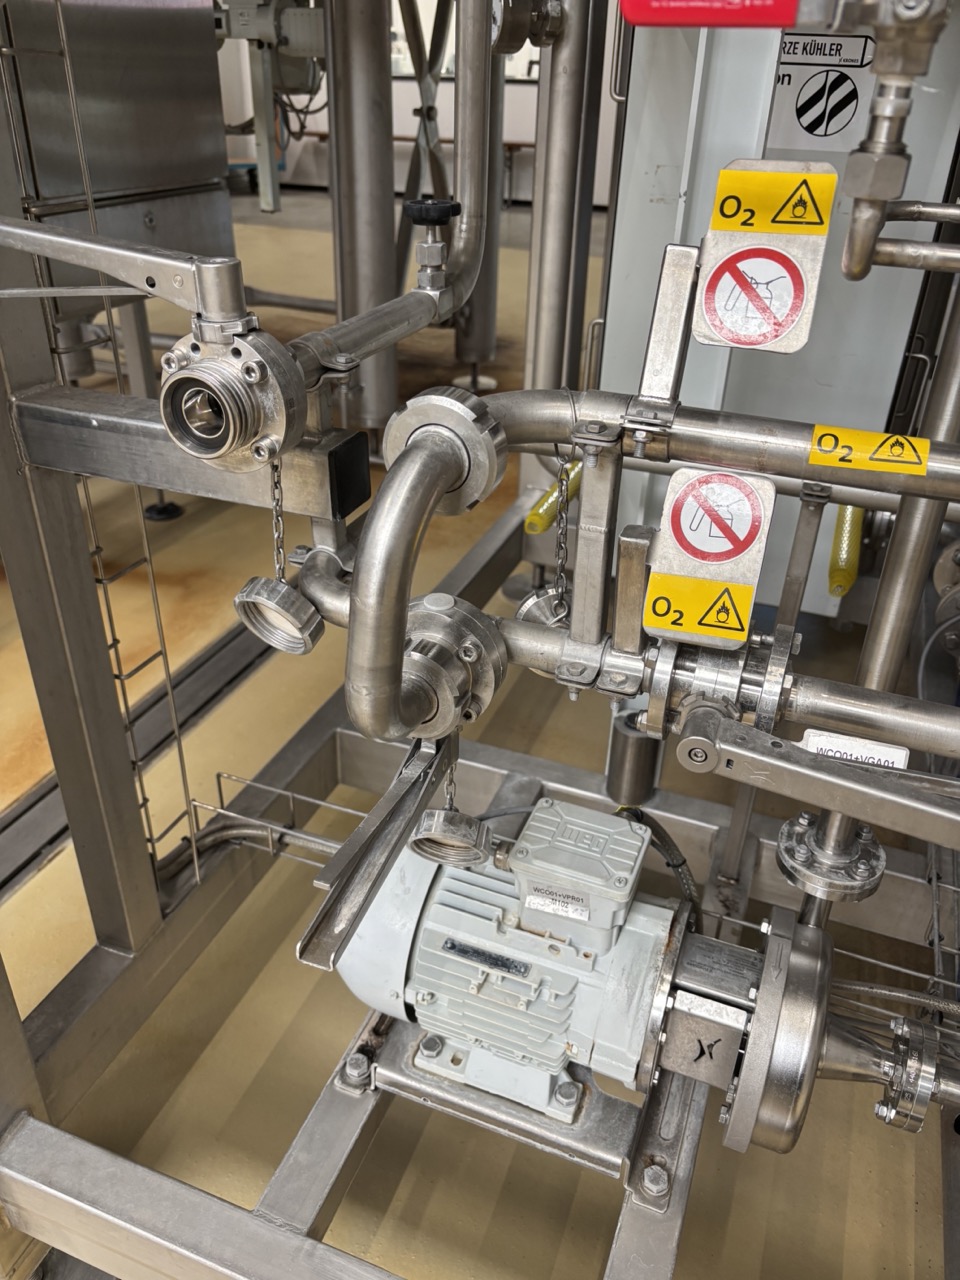
Warning
Close the aeration/O₂ gully valve before starting CIP. If it is left open, liquid runs out continuously, causing constant loss and risking pumps running dry.
2. Cellar Setup
Select the setup that applies to this brew. Setup A is standard for brew days.
Setup A — Brew Day, Harvested Yeast Pitch:
Note
All fittings must be installed before CIP starts.
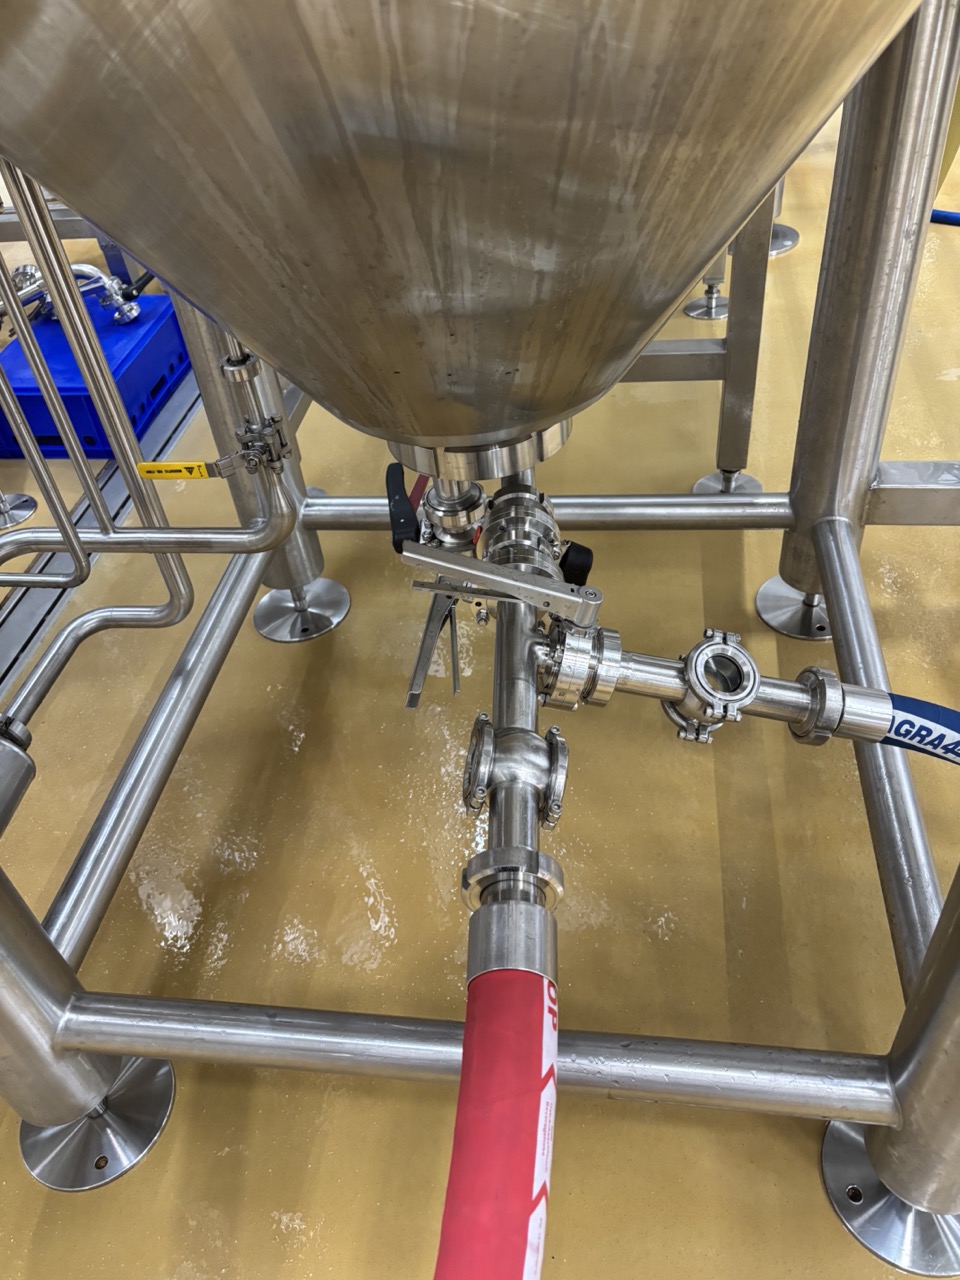
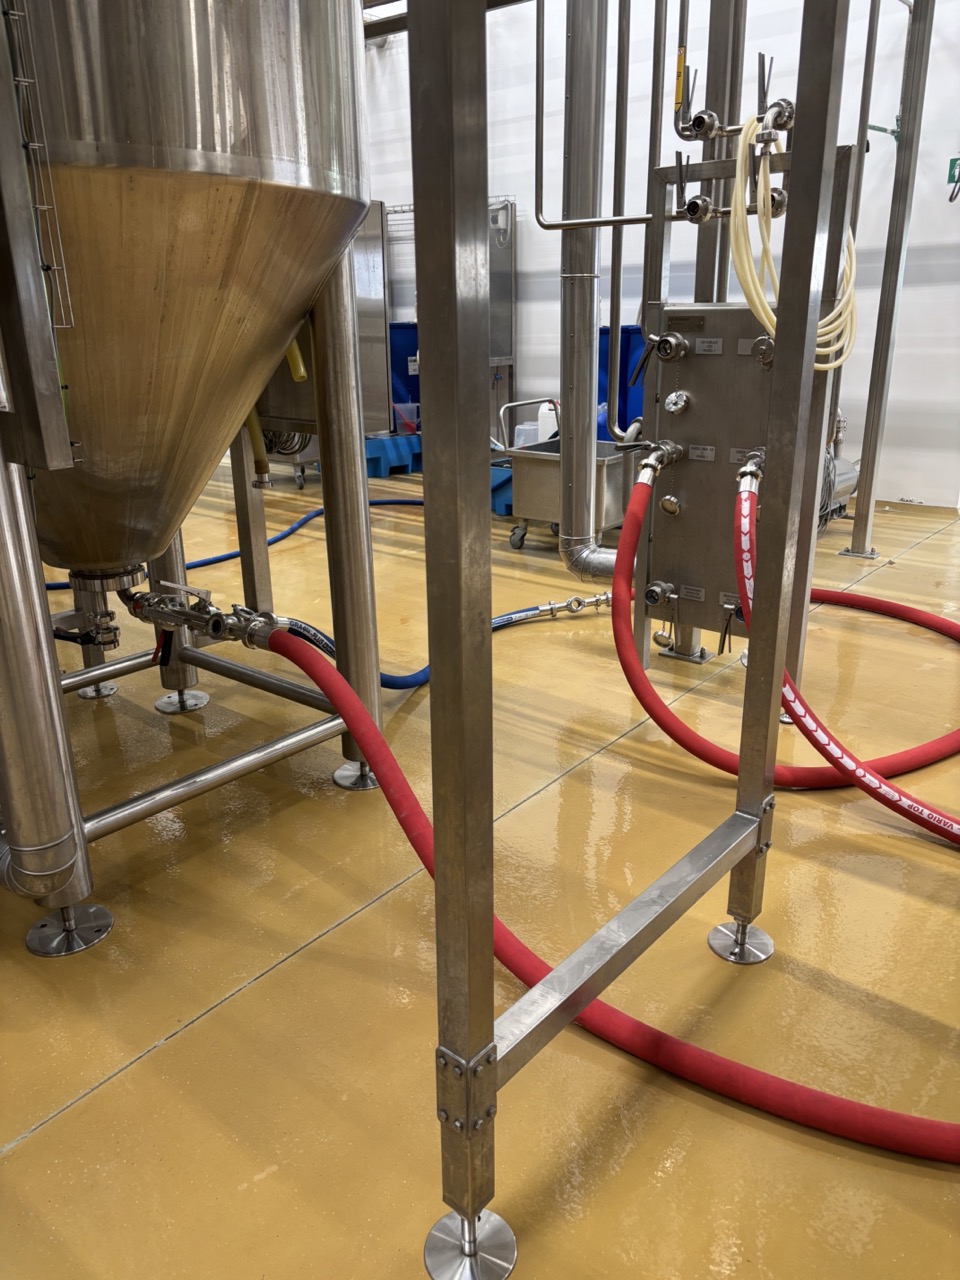
- Connect the T-piece to the tank outlet. For a second batch, connect to the racking arm or standing pipe outlet instead.
- Install the yeast pitch line fittings at the T-piece in order: sightglass → short DN40 hose → sightglass with tri-clamp → tri-clamp to DN adapter → long hose to CIP return on the active panel.
- Connect a long DN40 hose from the front of the T-piece to the Würze/CIP outlet on the active panel.
- Set the Panel 1 swing bend as per the panel/tank reference table.
For tanks 13–19 (Panel 2 active):
For tanks 1–11 (Panel 1 active):
Setup B — Brew Day, Fresh Yeast or Second Batch:
- Connect the T-piece to the tank outlet, racking arm, or standing pipe as appropriate.
- Connect a long DN40 hose from the T-piece to the Würze/CIP outlet on the active panel.
- Connect the return hose from the CIP return on the active panel back to the T-piece.
- Set the Panel 1 swing bend as per the panel/tank reference table.
Setup C — End of Day / End of Week / No Wort (CIP WW EOD and CIP WW WEE):
Both the daily end-of-day and the weekly end-of-week wortway cleans use this same setup and procedure — they differ only in when they are triggered. The purpose is to clean the wortway before it sits idle, preventing deposit buildup overnight or over the weekend. No tank is connected.
- Connect a swing bend at Panel 1 directly connecting the delivery and return lines.
- Connect a swing bend at Panel 2 in the same way.
3. Botec — CIP
-
Acknowledge all swing bend and panel changes in the Botec system visualisation.
-
Acknowledge the cellar line setup on the wort cooler page in Botec and clear the cellar line alarm.
-
Open the Botec batch schedule under 002 Brewhouse → CIP Brewhouse and select the recipe "WK Caustic + Acid [1] V 1.02". This recipe uses Caustic (IC 1002) and Acid (DI 1011).
Note
If deposits are visible in the DN25 brewhouse panel lines — brown discolouration as shown below — add 10–20 L Wasserstoffperoxid (hydrogen peroxide) to CIP Tank 1 before launching. This breaks down the turbulence-driven residue that forms specifically in the narrow-bore lines and is not fully cleared by caustic alone.

-
Before launching, verify that forward flow is shown on the wort cooling page. If there is no flow indication, there is a problem with the line or valve setup — do not proceed until resolved.
- Set the timing and launch the recipe. Allow it to run to completion.
4. Botec — Sanitisation
- At the start of the boil, load the recipe "WK Steri [1] V 1.00" from the same batch schedule.
- Launch the recipe and allow it to run to completion.
- Tick the WW CIP and WW Sani columns in the Brewing tab of the production spreadsheet and add your initials.
When sanitisation is complete, proceed to the Wort Knockout SOP for brewhouse panel rebuild, aeration setup, and cellar line prep.
Pre-Run Checklist
Brewhouse
- [ ] CIP system up-concentration completed
- [ ] Brewhouse panel swing bends configured for CIP
- [ ] Heat exchanger set to reverse flow
- [ ] Aeration swing bend in CIP position
- [ ] O₂ pipe drain closed — no red indicator visible
Cellar
- [ ] Correct setup selected: A (harvested yeast) / B (fresh yeast or 2nd batch) / C (end of week)
- [ ] T-piece connected to correct tank outlet (or racking arm / standing pipe for 2nd batch)
- [ ] Yeast pitch line fittings installed at T-piece before CIP start — Setup A only
- [ ] DN40 hoses connected: delivery and return to active panel
- [ ] Panel 1 swing bend set correctly per panel/tank reference table
- [ ] Yeast brink in position — Setup A only
Botec
- [ ] Swing bend and panel changes acknowledged in system visualisation
- [ ] Cellar line alarm cleared on wort cooler page
- [ ] Forward flow confirmed on wort cooling page before launching CIP
- [ ] WK Caustic + Acid recipe loaded, timed, and launched
- [ ] CIP completed before sanitisation started
- [ ] WK Steri recipe loaded and launched at start of boil
- [ ] WW CIP and WW Sani ticked in production spreadsheet with initials
Troubleshooting
| Issue | Likely Cause | Action |
|---|---|---|
| No forward flow shown in Botec on wort cooling page | Line or valve setup error | Do not launch. Check all swing bends, hose connections, and valve positions. Re-acknowledge in Botec. |
| CIP recipe cannot be launched | Cellar line alarm not cleared, or changes not acknowledged | Clear cellar line alarm on wort cooler page and re-acknowledge all changes in Botec. |
| Leak at hose connection | Loose fitting or missing gasket | Stop flow if possible. Re-tighten with key or replace gasket. Check all connections before starting. |
| Sanitisation recipe cannot start | CIP not yet completed | WK Caustic + Acid must run to completion before WK Steri can be launched. |
| CIP or steri ran but system could not complete a full cycle | Setup error or valve not open | Check Botec log for fault. Investigate setup and re-run if necessary. Do not proceed to wort transfer without a confirmed completed run. |