SOP — Cone Dumping: Trub, Yeast & Hops
FUERST WIACEK Version 1.2 | Cellar — all fermentation tanks | Frequency: as triggered (trub, yeast, hops)
Purpose
This SOP covers the three types of cone dump performed during and after fermentation: trub (post-brew solids), yeast, and hops (post-dry hop). Each has a distinct procedure, timing, and stopping criterion. All three share the same sanitation protocol for caps and outlets.
When to Dump
| Type | Timing | Notes |
|---|---|---|
| Trub | Within 8–12 hours of knockout. For early brews (4am mash-in) this is the same afternoon or evening. For day brews (10am mash-in) it may fall overnight — schedule accordingly. | Always dump trub before fermentation progresses too far |
| Yeast | Before dry hopping on beers that receive dry hops. For beers without dry hops, when called by the brewmaster — typically around cold crash day 3, then again one week later if needed | If the tank is scheduled for yeast harvest, do not dump — refer to the Yeast Harvest SOP |
| Hops | Monday following Thursday dry hop, or first working day if Monday is a day off | 4 days contact time before first dump. For beers that received more than 50 kg dry hop (typically double brew hoppy beers), perform a second hop dump 2 days after the first |
Equipment
All dumps - Alcohol spray - Water hose - PAA bath (for caps)
Trub dump - 5 L pitcher (1–3 pitchers)
Yeast and hop dumps - Short gully hose - Sightglass (installed between tank outlet and hose) - Buckets (standard size, approximately 30 L each)
CO₂ Line Purge
Before attaching CO₂ to any tank outlet, purge the line for approximately 5 minutes. Connect the line loosely to the CIP arm so CO₂ can escape freely. Set flow to low. If the line has not been used recently, purge for longer rather than shorter — when in doubt, keep purging.
Shared Sanitation Protocol
The following steps apply at the start and end of every cone dump, regardless of type.
Before dumping
- Remove the outlet caps and place them in the PAA bath. Leave them to soak until the dump is complete.
- Spray both outlets generously with alcohol.
After dumping
- Rinse both outlets thoroughly with water.
- Spray both outlets generously with alcohol.
- Retrieve the caps from the PAA bath, spray with alcohol, and refit them.
Procedure A — Trub Dump
Trub consists of dead yeast, hop particles, and protein solids that settle in the cone after knockout. No tank pressure is required for a trub dump. Removing it early improves fermentation conditions and reduces off-flavour risk.
- Apply the shared sanitation protocol — caps into PAA bath, spray outlets with alcohol.
- Open the bottom cone outlet slowly and allow 1–3 pitchers (5 L each) to drain. Continue until the discharge runs mostly clear of old yeast and hop particles.
- Close the outlet.
- Apply the shared post-dump sanitation protocol — rinse with water, spray with alcohol, refit sanitised caps.
- Mark the trub dump as complete on the fermentation spreadsheet.
Procedure B — Yeast Dump
Yeast settles in the cone during and after fermentation. Dumping it at the right time keeps the beer clean and prevents autolysis. The sightglass allows you to monitor what is coming through and judge when to stop.
Warning
If this tank is scheduled for yeast harvest, do not dump. Refer to the Yeast Harvest SOP.
Before opening the outlet, check the tank pressure. If it reads 0, add 0.2–0.4 bar CO₂ before proceeding. Maintain positive pressure throughout the dump.
- Apply the shared sanitation protocol — caps into PAA bath, spray outlets with alcohol.
- Connect the sightglass between the tank outlet and the short gully hose. Spray down the sightglass and all connections with alcohol.
- Position a bucket under the hose outlet.
-
Open the outlet slowly. The goal is a controlled, even flow that allows the yeast cone to slide down gradually without pulling tunnels through the settled material inside the tank.
Note
Go as slow as possible. If the flow is too fast it pulls channels through the yeast bed and you lose the ability to get an even, clean dump.
-
Monitor the sightglass as the yeast flows through. When the flow transitions from thick yeast slurry to a milky liquid, prepare to stop.
- Stop dumping when the discharge becomes liquid. It will remain milky — this is normal and expected. If you are unsure whether to continue, check with the team.
- When a bucket is full, close the outlet, move the bucket to the gully, and empty it. Count the number of buckets dumped. One bucket ≈ 30 L.
- Once the yeast dump is complete, open the racking arm or standing pipe outlet (depending on which the tank has) and dump approximately 1 L — roughly one short burst into a bucket or pitcher — to remove any residual settled material from that line.
- Apply the shared post-dump sanitation protocol — rinse with water, spray with alcohol, refit sanitised caps.
- Log the total volume dumped in the fermentation spreadsheet (number of buckets × 30 L, plus any additional volume).
Procedure C — Hop Dump
After dry hopping, spent hops settle in the cone. Before opening the outlet, pressurise the tank to 1 bar CO₂. The dump procedure is the same as for yeast but the stopping point is easier to judge — the transition from hops to liquid is usually clear and sudden.
- Apply the shared sanitation protocol — caps into PAA bath, spray outlets with alcohol.
- Connect the sightglass between the tank outlet and the short gully hose. Spray down the sightglass and all connections with alcohol.
- Position a bucket under the hose outlet.
- Open the outlet slowly, as with the yeast dump — controlled flow to allow the hop material to slide down evenly.
- Monitor the sightglass. The hop material will transition to clear liquid more abruptly than yeast.
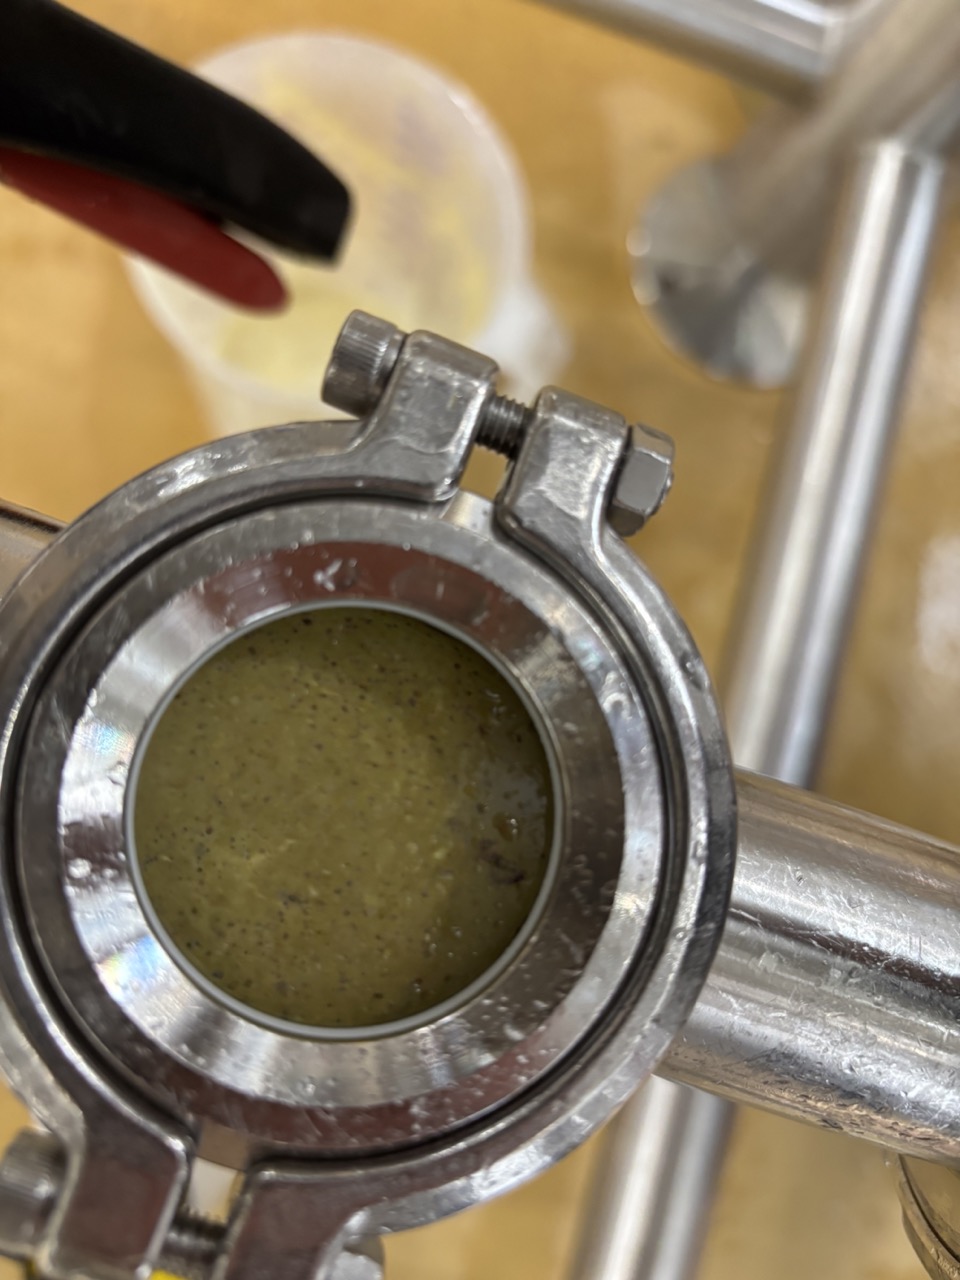

Stop when the flow turns to liquid (green liquid and/or foam visible in the sightglass). At this transition point you can briefly reopen the outlet to top up the current bucket — but do not start filling a new one.
- When a bucket is full, close the outlet, empty it into the gully, and count the volume. One bucket ≈ 30 L.
- Once the hop dump is complete, open the racking arm or standing pipe outlet and dump approximately 1 L to clear any residual material from that line.
- Apply the shared post-dump sanitation protocol — rinse with water, spray with alcohol, refit sanitised caps.
- Log the total volume dumped in the fermentation spreadsheet.
Note
If the beer received more than 50 kg of dry hop — typically the case on a double brew hoppy beer — perform a second hop dump 2 days after the first. Repeat this procedure in full, including sanitation and volume logging.
Troubleshooting
| Issue | Likely Cause | Action |
|---|---|---|
| Flow stops during yeast or hop dump | Outlet blocked by compacted material | Close outlet, wait briefly, then increase pressure to 2 bar to help clear the blockage. Once flow resumes, reduce pressure back to 0.2–0.4 bar for yeast dumps or 1 bar for hop dumps before continuing. |
| Discharge becomes liquid quickly — unsure whether to stop | Thin yeast layer or tunnelling inside tank | Stop and check with team before continuing. Refer to sightglass — if it runs dry and stays clear after closing, the dump is done. |
| Sightglass runs dry immediately after closing outlet | No more material in cone — dump complete | This is the confirmation that the dump is finished. Proceed to post-dump sanitation. |
| Yeast still needed for harvest after dump has started | Scheduling error | Stop immediately and notify the team. Log what was dumped and flag on the fermentation sheet. |