SOP — Carbonation
FUERST WIACEK Version 1.4 | Cellar — all fermentation tanks | Frequency: per batch (Tue–Fri after 1st hop dump until in spec)
Purpose
This SOP covers carbonating beer by bubbling CO₂ through the racking arm or standing pipe, and adjusting CO₂ up or down when a reading comes back out of spec. Carbonation takes place after fermentation is complete and the beer is cold-crashed.
PPE Required
- Safety goggles when connecting to pressurised tanks
- Gloves
Risks
| Hazard | Risk |
|---|---|
| Beer running into CO₂ line | Contamination of CO₂ line and regulator — always close the tank side first before closing the CO₂ line |
| Pressurised connection | Spray of beer or gas if connection is not secure — always purge loose first |
| Over-carbonation | Hard to reverse — bubble conservatively and re-measure |
CO₂ Line Rule
Warning
Always close the tank valve (or racking arm, standing pipe, CIP arm — whatever the CO₂ line is connected to) FIRST. Then close the CO₂ line. If you close the CO₂ line first, beer will run back into the connection under tank pressure. This contaminates the line and the regulator.
Always use the chain to secure whatever you connect the CO₂ line to. It makes it much easier to disconnect later and keeps the fitting from being lost.

This rule applies everywhere CO₂ is connected to a tank — top pressure, dry hopping, carbonation.
Pre-Conditions
Before starting carbonation, confirm all of the following:
- Beer is cold (crashed to target temperature)
- Tank is at approximately 1 bar pressure. If not, add top pressure via the CIP arm first.
CO₂ reading: Only required if the beer already has CO₂ in it. This applies when: - The tank was spunded to 1 bar during fermentation (e.g. lagers) - The beer was dry hopped warm (e.g. West Coast IPAs)
For beers that have been cold-crashed without spunding — typically hazy IPAs — there will be minimal CO₂ in solution after crashing. It is safe to bubble without a prior reading.
Dump the racking arm or standing pipe before bubbling:
Do a small dump from the racking arm (tanks 1–7) or standing pipe (tanks 9–19) into a pitcher before connecting CO₂. This clears any residual yeast, hops, or trub sitting in the line — otherwise bubbling will push that material back up into the beer. This is just a short shot, not a full dump. If you see no hops or yeast coming out, you are good. The main cone dump should already have been done at an earlier stage.
Process
1. Check Tank Pressure
Confirm tank is at ~1 bar. If not, add top pressure via the CIP arm before connecting CO₂ for bubbling.
2. Dump Racking Arm or Standing Pipe
Open the racking arm drain (tanks 1–7) or standing pipe (tanks 9–19) briefly into a pitcher. You should see clean beer or nothing — if no hops or yeast appear, close and proceed. This small dump ensures the CO₂ will push clean gas into the beer, not residual material from the line.
3. Connect CO₂ — Purge First
- Connect the CO₂ line to the racking arm or standing pipe — loose, not fully tightened.
- Open the CO₂ slightly and purge the line for at least 5 minutes. This is critical — you will be bubbling this gas directly through the beer. Any air or contamination in the line goes straight into the tank.
- After 5 minutes or more, tighten the connection fully.
- Secure the chain to the fitting.
4. Bubble

Note
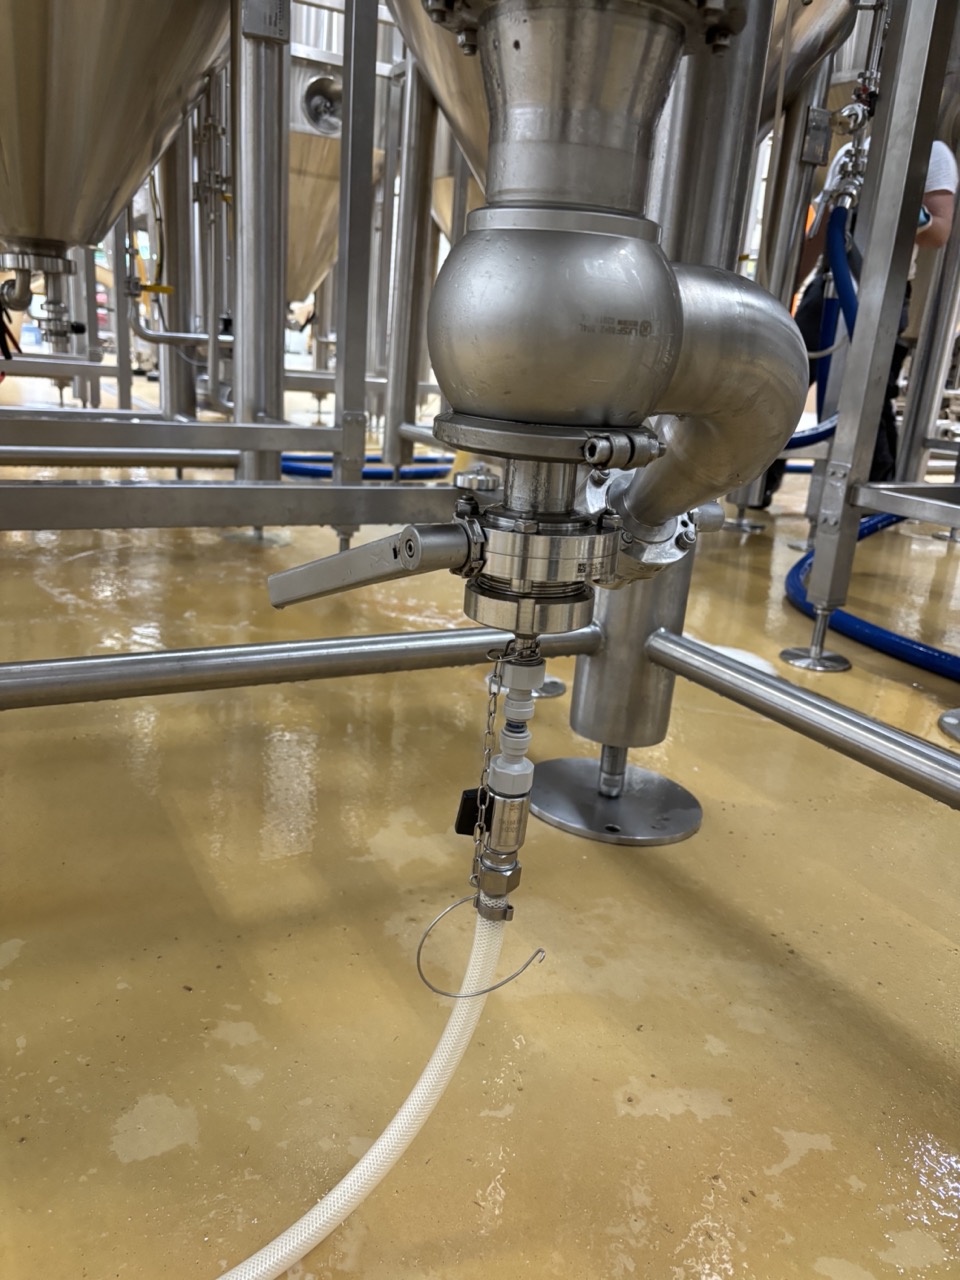
Tanks 1–7 (racking arm): Before bubbling, lift the racking arm to approximately the 1–2 o'clock position, as shown in the image above. This ensures the CO₂ enters the beer from the side and bubbles up through the full volume. Standing pipes on tanks 9–19 are fixed vertical — no adjustment needed.
- Open the small CO₂ valve mostly fully or fully. This is important — keeping this valve mostly open prevents beer from running back into the CO₂ line during bubbling.
- Dial in the flow rate using the tank valve. This is usually only a small amount open. You should be able to hear slow, steady bubbles.
Note
The flow rate is low — think of it as matching the speed at which the spund would be blowing off. The spund will not open immediately; it takes a few minutes before pressure builds enough to vent. That gives you an idea of the pace.
- Set a timer for 2 hours (first round).
- Inform team members that the tank is carbonating in case someone else needs to take over.
- Log the start time and planned duration in the fermentation sheet for this beer.
5. Stop Bubbling
When the timer is done:
- Close the tank valve first.
- Then close the CO₂ line.
- Log the actual bubbling duration in the fermentation sheet.
6. Allow to Equilibrate
Leave the tank for several hours before taking a CO₂ reading. The CO₂ needs time to absorb evenly into the beer.
7. Take CO₂ Reading
Take a CO₂ reading with the Haffmans handheld. Refer to the Haffmans SOP for the full measurement procedure.
Compare the result against the target CO₂ for the beer, then follow the CO₂ Adjustment section below.
CO₂ Adjustment
CO₂ Too High
| Amount over target | Action |
|---|---|
| 0.1–0.2 g/L | Remove head pressure abruptly via the CIP arm valve — open it sharply to vent |
| > 0.2 g/L | Vent pressure as above, then rouse: open CO₂ to 100% and tank valve to 100%. Full blast — 3 seconds per 0.2 g/L over target. If multiple bursts needed, close the tank valve for 1 second between bursts. |
CO₂ Too Low
| Amount below target | Bubble time |
|---|---|
| 0.1 g/L | 10 minutes |
| 0.2 g/L | 20 minutes |
| 0.3 g/L | 30 minutes |
| 0.4 g/L | 40 minutes |
| Each additional 0.1 g/L | +10 minutes |
For a double batch tank, double the bubbling time.
Follow the same procedure as the first round: purge loose for 5 minutes, tighten, small CO₂ valve mostly open, dial flow with tank valve. Log the additional bubbling time in the fermentation sheet. Re-measure after equilibration.
CO₂ In Spec
Reduce head pressure to 0.5–0.6 bar via the spund. The beer is ready for packaging.
Checklist
- [ ] Beer cold, tank at ~1 bar
- [ ] CO₂ reading taken if beer was spunded or dry hopped warm
- [ ] Short dump from racking arm or standing pipe — no hops or yeast visible
- [ ] CO₂ line connected loose and purged for at least 5 minutes
- [ ] Connection tightened and chain secured
- [ ] Racking arm lifted to 1–2 o'clock position (tanks 1–7 only)
- [ ] Small CO₂ valve mostly or fully open
- [ ] Flow dialled with tank valve — slow, steady bubbles audible
- [ ] Timer set (2 hours first round)
- [ ] Team informed
- [ ] Start time and duration logged in fermentation sheet
- [ ] Tank valve closed first, then CO₂ line closed
- [ ] CO₂ reading taken after equilibration
- [ ] Adjustment made if needed (see CO₂ Adjustment above)
- [ ] Head pressure reduced to 0.5–0.6 bar via spund once in spec
Troubleshooting
| Issue | Likely Cause | Action |
|---|---|---|
| No bubbles audible | Tank valve too closed, or CO₂ not flowing | Check CO₂ supply is open. Open tank valve a fraction more. |
| CO₂ reading not improving after bubbling | Insufficient contact time or flow rate too low | Bubble for a longer second round. Confirm flow rate is correct — slow and steady. |
| Beer in CO₂ line or regulator | CO₂ line was closed before the tank side | Purge the CO₂ line thoroughly before next use. Inform team. |
| CO₂ consistently over target | Over-bubbled | Vent pressure and rouse as per adjustment guide. Re-measure. |