SOP — Wort Knockout
FUERST WIACEK Version 1.2 | Cellar & Brewhouse — wort transfer to fermentation tank | Frequency: per brew (at knockout)
Purpose
This SOP covers everything from the end of wortway sanitisation through to the tank being sealed, glycol cooling active, and the fermentation recipe running. It includes aeration setup, the knockout transfer procedure, yeast pitch, and initial Botec fermentation recipe setup.
Wortway CIP and sanitisation are covered in the Wortway CIP & Sanitisation SOP. Fermentation management after knockout is covered in the Fermentation Management SOP.
PPE Required
- Safety goggles
- Gloves
- Flashlight (essential during knockout)
Risks
| Hazard | Risk |
|---|---|
| Hot wort transfer | Burns from splashing or leaks — keep connections tight |
| Pressurised tank | Spray of liquid if opened incorrectly |
| Poor or absent aeration | Severe fermentation problems — check aeration before knockout |
| O₂ line contamination | If left open after knockout, requires at minimum PAA sanitation before reuse |
| Hop material in sightglass | Can block sightglass view — use flashlight |
Overview
The knockout sequence has two main moments:
- First cut — early wort + hop material is dumped to drain, then the inlet is opened and the tank begins filling (~60 min to fill)
- End of knockout — wort/water mix or hop material signals end of transfer; tank is closed and cooling begins
Between these two moments the brewer monitors aeration, checks the sightglass, and sets up the fermentation recipe in Botec.
Part 1 — Aeration Setup (Before Knockout)
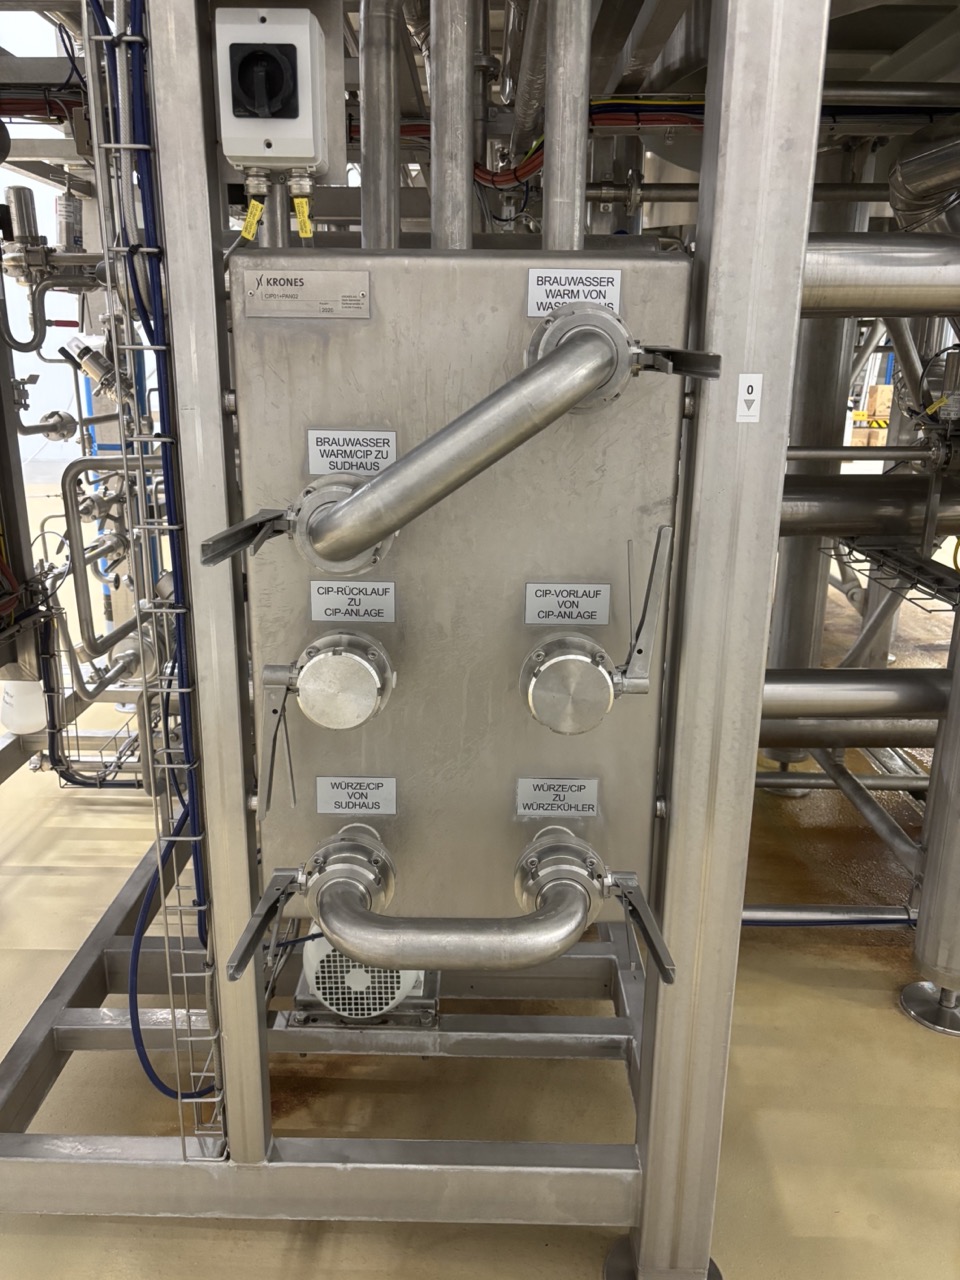
Aeration is set up at the brewhouse, next to the heat exchanger, when rebuilding the panel from wortway CIP / sanitisation config to wort cooling config.
1. Rebuild Panel and Valves for Wort Cooling
When wortway sanitisation is complete:
- Set the heat exchanger valves to forward flow — this is the reverse of the CIP/sani backflush configuration.
- Rebuild the aeration line — during CIP and sanitisation the aeration section is cleaned as part of the wortway circuit. For knockout you need to reconfigure it to add oxygenation to the wort.
- Connect the aeration line as per the brewhouse connection reference at the heat exchanger — see the Wortway CIP & Sanitisation SOP for the panel and valve configuration.
-
The swing bend connecting the wort line to the heat exchanger can be installed now, but leave the bottom panel valves closed — these connect wort to the heat exchanger and must stay closed until the boil is complete.
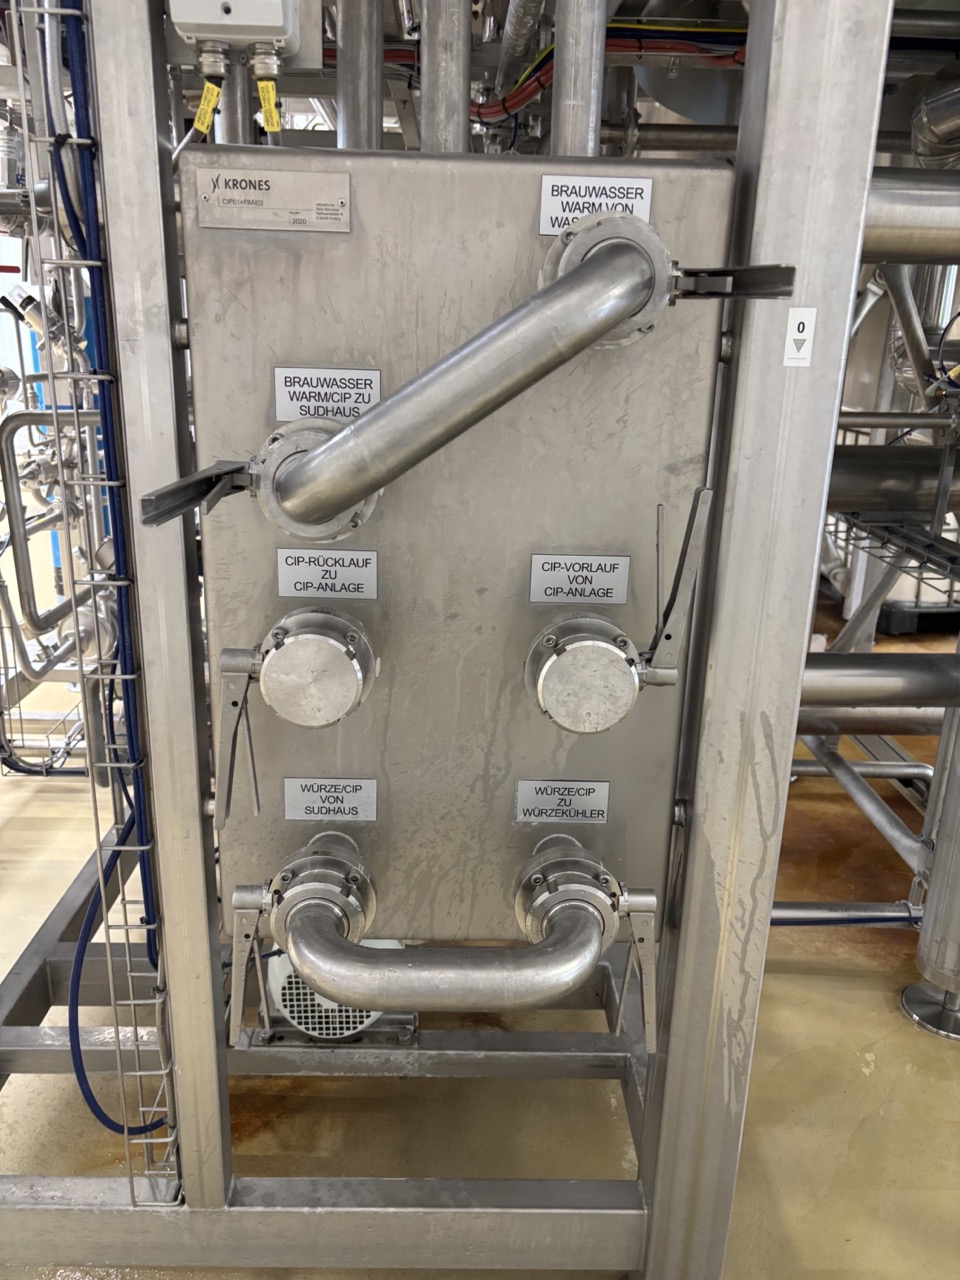
Open these valves only when the boil is finished and you are going to take the end-of-boil sample. Acknowledge the valve change in Botec.
Warning
The O₂ bottle line must be closed during any wortway CIP or sanitisation. After knockout, if you will be running another wortway CIP, close the O₂ line before starting. An open O₂ line requires at minimum a PAA soak before it can be used again.
2. Check Aeration — First Brew of the Week
If this is the first brew of the week, dip the aeration connection into PAA during the day before connecting to the O₂ bottle.
3. Connect and Test Aeration
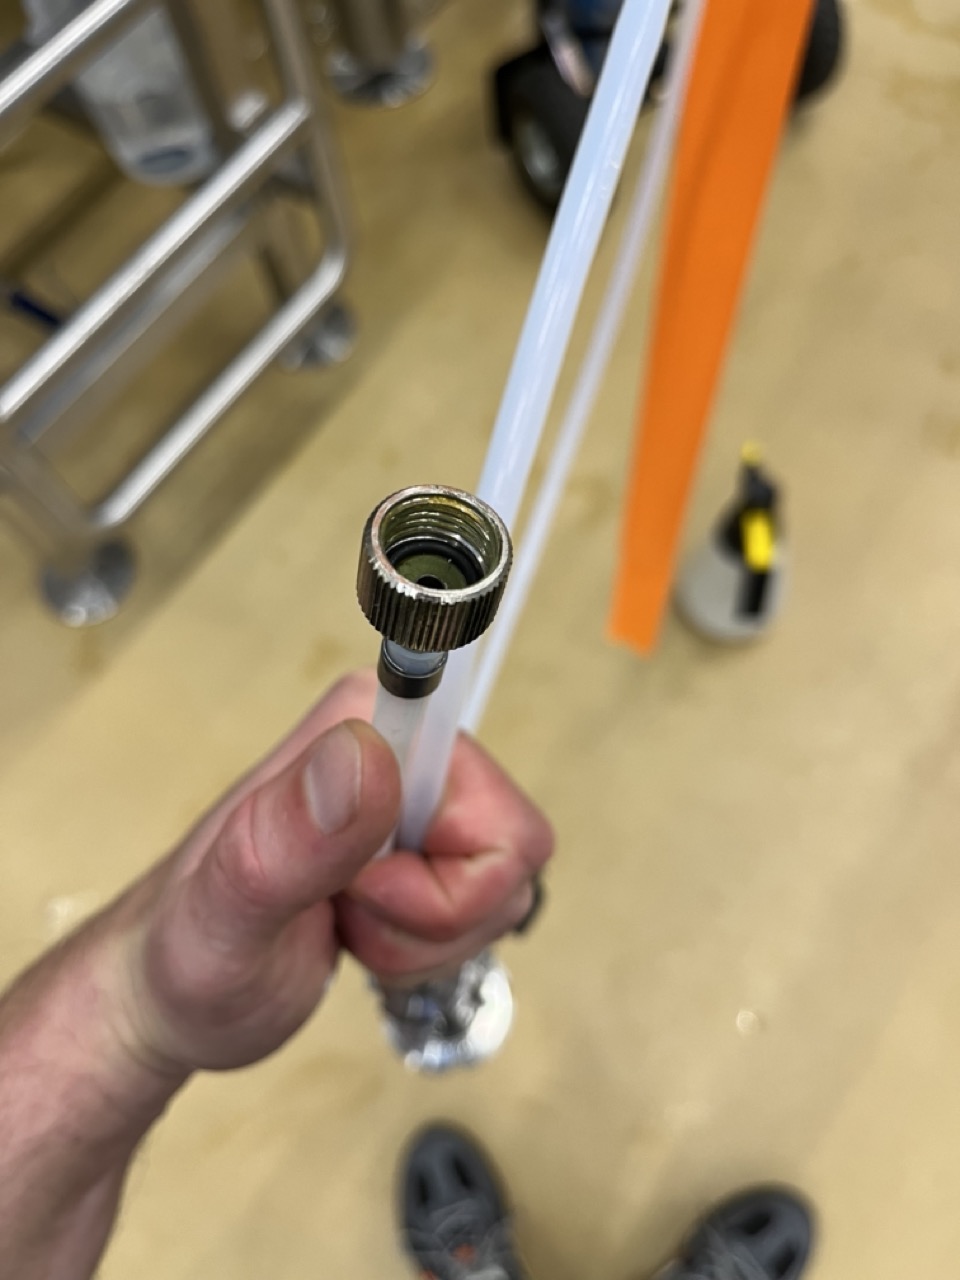
-
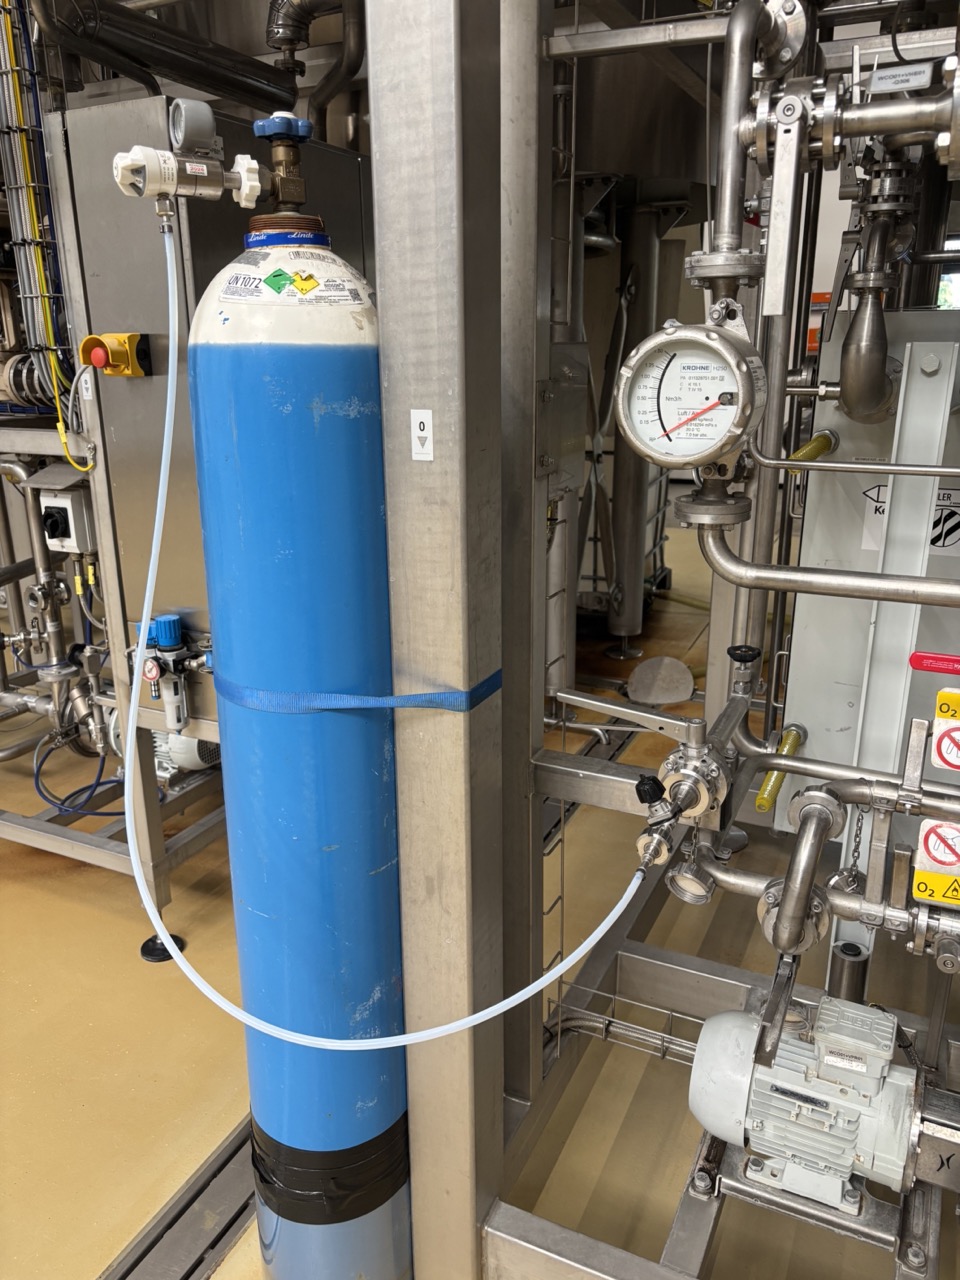
Connect the aeration line to the O₂ bottle. Make sure the O-ring is correctly seated in the connection — missing O-ring means little or no aeration, which causes severe fermentation problems.
-
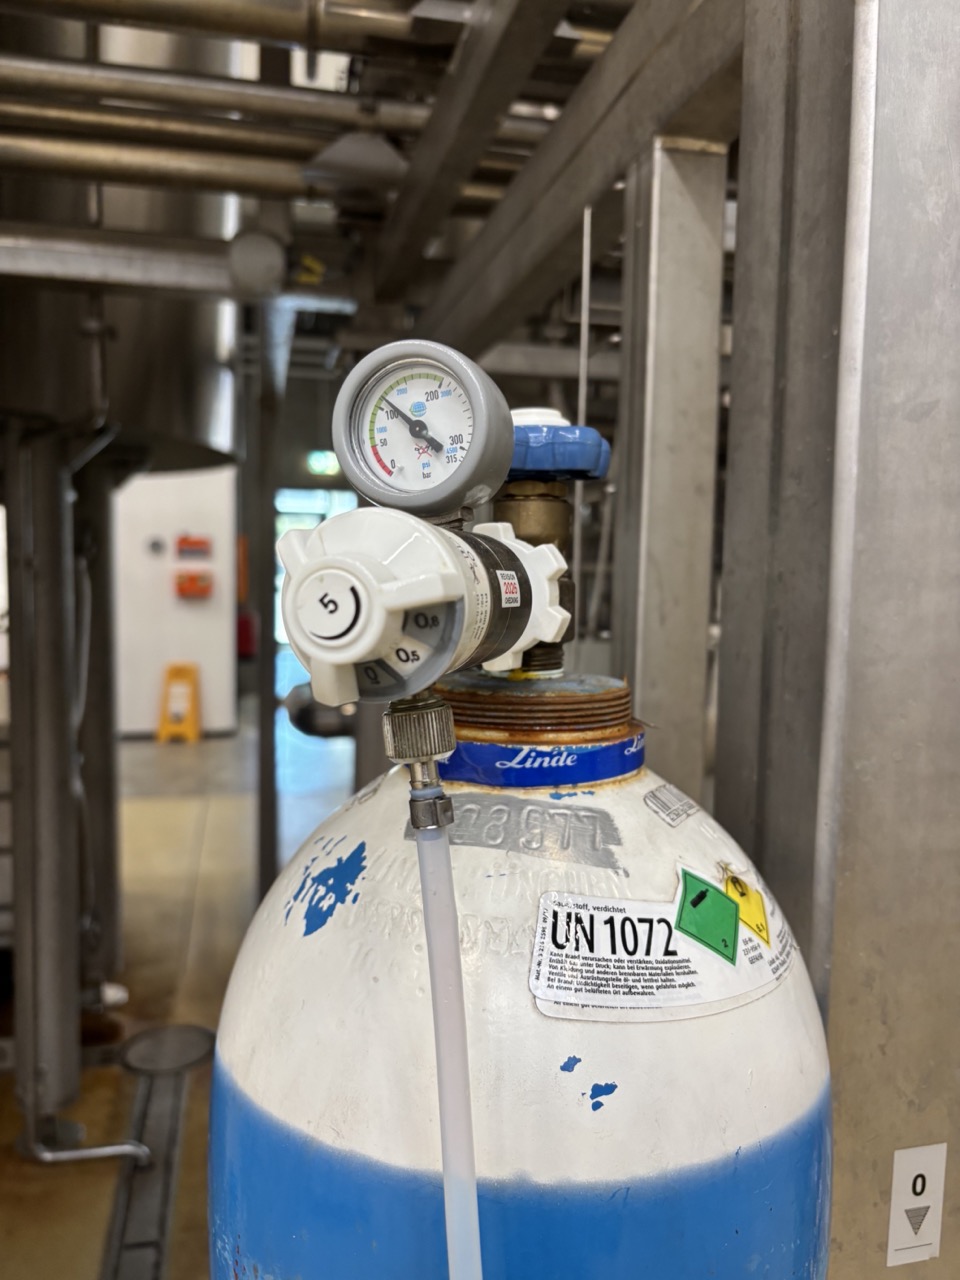
Open the O₂ bottle.
-
Set the flow according to the recipe — typically 0.5 L/min (check the brew sheet for recipe-specific values).
-
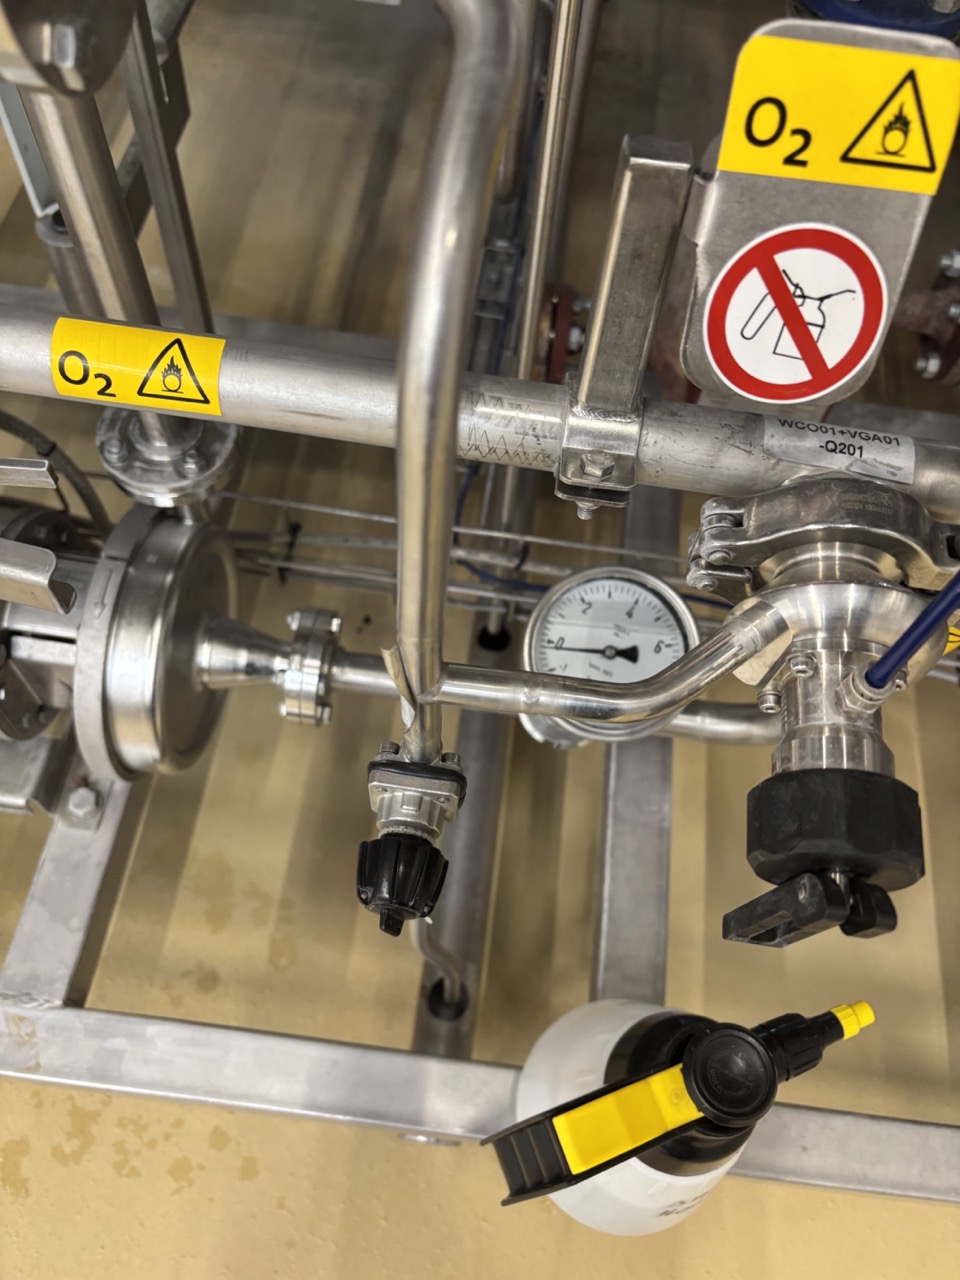
Test pressure: Open the drain valve on the aeration line. Confirm there is positive pressure and flow. Close the valve. Wait 10 seconds and open again — pressure should have rebuilt. If it has not, check the O-ring and all connections.
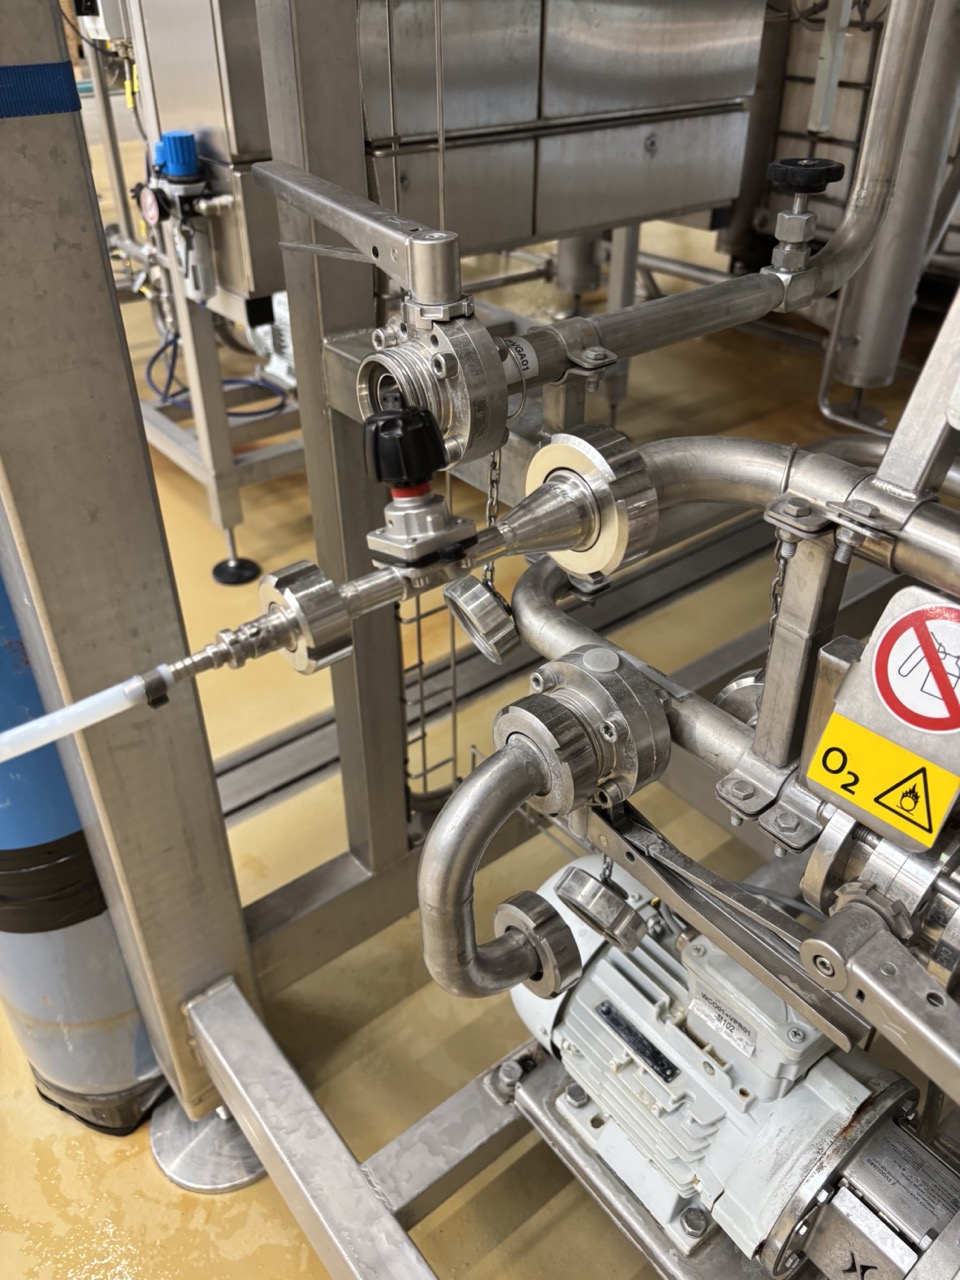
Note
The valve handle has a red indicator visible when open. During the pressure test, it briefly turns red, then back to neutral when you close it. During actual knockout, the aeration valve at the wortway connection is left in the open position (as shown above).
Warning
No or poor aeration leads to severe fermentation problems. Confirm aeration is working before knockout begins.
Part 2 — Cellar Prep Before Knockout
4. Cellar Line Prep
When wortway sanitisation is complete, the return hose can be detached from the panel at the cellar.
- Close the valve at the tank T-piece to keep the connection clean.
- If pitching harvested yeast: dip the open end of the return hose into a container with PAA to keep it sanitised — it will be reconnected to the yeast brink before knockout.
- If not pitching harvested yeast: the hose end can remain open.
5. Confirm Tank Ready
- Tank has been CIPed and PAA has been emptied.
- Fermentation recipe is loaded in Botec — or you will load it at step 9.
- Yeast brink is in position if pitching harvested yeast.
Part 3 — Knockout Transfer
6. First Knockout Alarm — First Cut
Botec sounds an alarm when the brew is ready for knockout. Acknowledge it in Botec. You have approximately 15 seconds before knockout starts — go to the tank immediately.
Bring your flashlight.
- Open the T-piece drain valve. The wortway line is still full of water from the sanitisation. Watch the liquid in the sightglass using the flashlight.
- For heavily hopped worts (IPAs etc.) the sightglass will transition from clean water to dark, hop-laden wort. This material should be dumped to drain — do not let it into the tank.
-
Watch for the wort to clear in the sightglass. When it clears and looks like clean, good wort:
- Close the T-piece drain valve
- Open the tank inlet valve
- Open the CIP arm valve approximately 45° — this prevents pressure building up in the tank as it fills. Do not open it fully.
-
The tank now begins filling. This takes approximately 60 minutes.
Note
For lightly hopped beers the transition from water to wort may happen quickly. Stay alert and use the flashlight to catch it.
7. During Filling
While the tank is filling:
- Double-check aeration is working at the brewhouse (flow and pressure confirmed as per step 3).
- Set up the fermentation recipe in Botec (see Part 4 below).
- If pitching harvested yeast, connect the yeast brink line now (see Part 5 below).
8. Second Knockout Alarm — End of Transfer
Botec sounds a second alarm at the end of the boil / end of knockout. Acknowledge it. You have approximately 15 seconds — go to the tank immediately.
Watch the sightglass:
- Push wort into the tank until the sightglass shows it lightening (wort diluting with water from line rinse) or turning hop-heavy again (for hoppy beers).
- Either signal = stop. Close the tank inlet valve. Open the T-piece drain valve.
- The Botec recipe will continue rinsing the wortway line. Let it complete.
Then:
- Close the CIP arm valve.
- Confirm the spund is set to 0.2 bar. Fill it with water.
- Open the glycol valve(s) — see glycol valve section below.
- Close the O₂ bottle.
- Return to Botec and set the aeration line to closed/off status if applicable.
-
Close all valves on the aeration line and hang it on the DN25 connection point for storage.
Part 4 — Fermentation Recipe Setup in Botec
9. Load the Fermentation Recipe
The recipe ID is printed on the brew sheet.
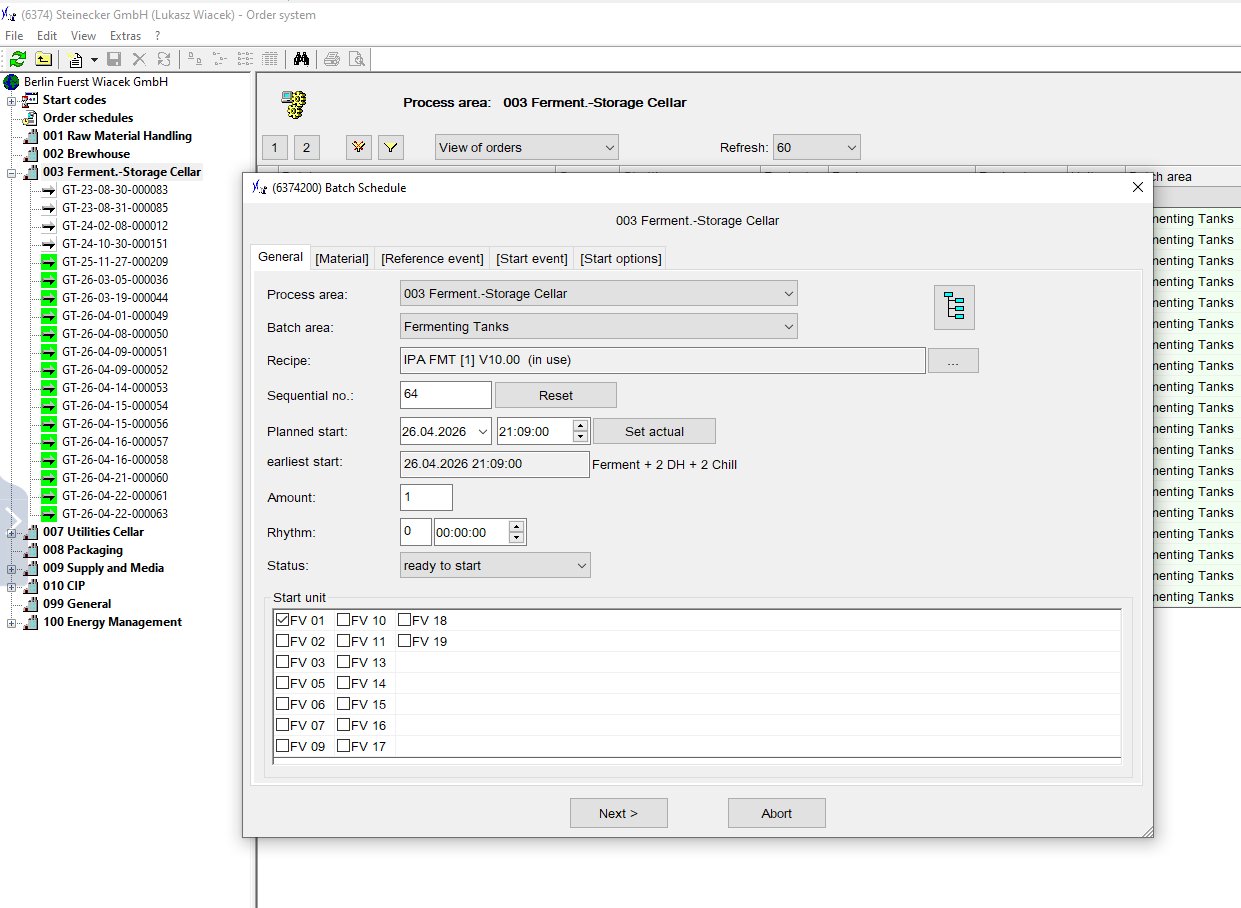
- In Botec, go to 003 Ferment.-Storage Cellar → Order schedules.
- Open the Batch Schedule. Set:
- Process area: 003 Ferment.-Storage Cellar
- Batch area: Fermenting Tanks
- Recipe: select by recipe ID from the brew sheet
- Status: Ready to start
- Start unit: select the correct tank (FV 01, FV 05, etc.)
- Click Next and complete the sequence to load the recipe.
10. Advance Recipe to Filling
Once the recipe is loaded:
- Advance it to the Filling FMT step.
- When the tank is filling, read the volume in Botec and enter it into the recipe. Botec will not allow glycol cooling until a volume is entered.
11. Advance Recipe After Filling — Single Brew
When the knockout is complete and the tank has its full wort addition:
- Read the final volume from Botec and confirm it is logged.
- Advance the recipe to Rising Post Filling.
12. Advance Recipe After Filling — Double Brew
If this tank will receive a second wort addition:
- Set the recipe to Filling FMT (hold it at this step).
- When the second wort addition is complete, advance to Rising Post Filling.
Warning
Do not advance to Rising Post Filling until the tank has received its final wort addition.
Part 5 — Yeast Pitch (Harvested Yeast)
Yeast pitch happens during filling — after the T-piece drain is closed and the tank inlet is open.
13. Connect Brink
- Connect the yeast pitch hose (the sanitised return line, dipped in PAA earlier) to the yeast brink.
- The brink should be on a scale and CO₂ should be connected to it.
14. Pitch Yeast
From the cell count you know how many kg to pitch.
- Open the bottom valve at the brink.
- Open the T-piece valve slightly — the brink usually has residual pressure which will push yeast out into the wortway. Watch the sightglass before the T-piece.
- Once yeast is visible in the sightglass, close the T-piece valve and tare the scale to zero. This is your reference point for how much yeast you pitch.
- Open the T-piece valve slightly again and pitch slowly. Watch the kg on the scale.
Note
The flow can be fast. If flow slows and more pressure is needed: open the CO₂ at the panel briefly to fill the line, then close it. Then open the valve at the brink slightly to add a small amount of CO₂ pressure. Keep CO₂ pressure low — the tri-clamp fittings are harder to remove under high pressure once pitching is done.
- When the target kg is reached, close the T-piece valve first, then close the brink valve.
15. Aeration Rule — Double Brew
When pitching yeast into a double brew tank receiving its second wort addition, only aerate if the first brew has not yet fermented more than 2°P.
Check this during the second brew's boil — there is plenty of time. Look at the fermentation sheet for the first brew's current Plato reading.
Part 6 — Glycol Valves
16. Set Glycol Valves
Open glycol valves on the tank and confirm them in Botec.
| Fill level | Open glycol jacket(s) | Close |
|---|---|---|
| Single brew (18–24 hl) | Bottom jacket only | Cone and Top |
| Double brew — 1st wort (18–24 hl) | Bottom jacket only | Cone and Top |
| Double brew — 2nd wort added (36–48 hl) | Top jacket only | Bottom and Cone |
Note
During fermentation always use only the highest jacket that still covers the wort volume. For a full double brew this is the Top jacket. For a single brew or first addition of a double brew, it is the Bottom jacket.
Also set the glycol jackets in Botec to match what is physically open on the tank.
End of Knockout — Wortway Rebuild (If Running Another CIP)
If a wortway CIP follows this knockout:
- Close the O₂ bottle line first.
- Rebuild the brewhouse panel and heat exchanger valves back to CIP / reverse flow configuration.
- Rebuild the aeration section back to CIP configuration (disconnect the O₂ line from the aeration inlet).
Checklist
Aeration
- [ ] Heat exchanger rebuilt for forward flow / wort cooling
- [ ] Aeration line reconnected at brewhouse
- [ ] If first brew of week: aeration connection dipped in PAA
- [ ] O-ring confirmed present in O₂ line connection
- [ ] O₂ bottle opened, flow set per recipe (typically 0.5 L/min)
- [ ] Aeration pressure tested — drain valve check confirms positive pressure
Cellar prep
- [ ] Return hose detached from panel, valve at T-piece closed
- [ ] Return hose end dipped in PAA if pitching harvested yeast
- [ ] Tank confirmed CIPed and PAA emptied
- [ ] Yeast brink in position on scale if pitching harvested yeast
First knockout alarm — first cut
- [ ] Acknowledged in Botec within 15 seconds
- [ ] Flashlight in hand
- [ ] T-piece drain opened — water / hop material dumping to drain
- [ ] Sightglass watched for wort to clear
- [ ] T-piece drain closed when wort clears
- [ ] Tank inlet opened
- [ ] CIP arm opened ~45°
During filling
- [ ] Aeration confirmed working
- [ ] Fermentation recipe loaded in Botec (correct recipe ID, correct tank selected, status: ready to start)
- [ ] Recipe advanced to Filling FMT
- [ ] Volume entered in Botec
- [ ] Yeast pitch started if pitching harvested yeast
Second knockout alarm — end of transfer
- [ ] Acknowledged in Botec within 15 seconds
- [ ] Pushed wort until sightglass lightens or turns hop-heavy
- [ ] Tank inlet closed
- [ ] T-piece drain opened
- [ ] CIP arm closed
- [ ] Spund set to 0.2 bar and filled with water
- [ ] Glycol valves opened (physical + Botec) — correct jacket(s) for fill level
- [ ] O₂ bottle closed
- [ ] Aeration line valves closed, hung on DN25 connection point
Recipe
- [ ] Recipe advanced to Rising Post Filling (single brew or final addition)
- [ ] Recipe held at Filling FMT if second wort addition still to come
Yeast pitch (if harvested)
- [ ] Brink connected
- [ ] Yeast pitched slowly, scale monitored for target kg
- [ ] CO₂ pressure kept low throughout
- [ ] Aeration rule confirmed if double brew (only aerate if 1st brew <2°P drop)
Wortway rebuild (if CIP follows)
- [ ] O₂ bottle line closed first
- [ ] Panel rebuilt to CIP / reverse flow
- [ ] Aeration line disconnected from O₂, rebuilt for CIP
Troubleshooting
| Issue | Likely Cause | Action |
|---|---|---|
| No aeration pressure at drain valve test | O-ring missing, loose connection, or bottle empty | Stop. Check O-ring. Tighten connection. Check bottle. Do not proceed to knockout without confirmed aeration. |
| Sightglass very dark, hard to read | Hop-heavy wort or dirty sightglass | Use flashlight. Wait for transition to clear. |
| Botec will not allow glycol cooling | Volume not entered in recipe | Enter the tank volume in the Botec recipe before advancing. |
| Yeast flow too slow | Insufficient pressure in brink | Briefly open CO₂ at panel to pressurise line, then close. Add gentle pressure via brink valve. |
| Yeast flow too fast | Too much pressure | Close T-piece valve. Reduce pressure at brink. Reopen slowly. |
| Wortway CIP cannot start after knockout | O₂ line still open | Close O₂ bottle and disconnect line before building CIP circuit. |